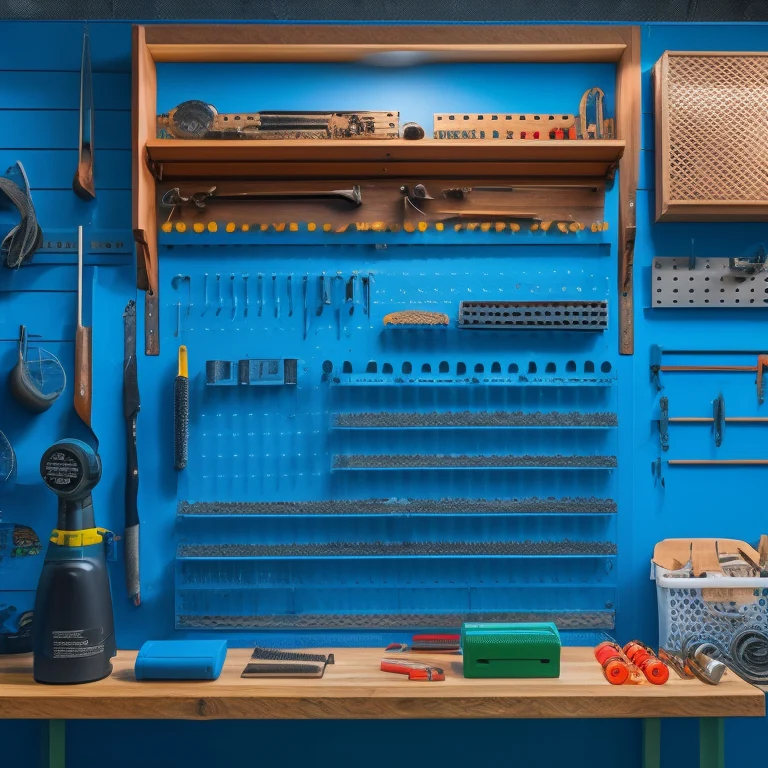
Create a Stunning Pegboard Wall With Ease
You'll create a stunning pegboard wall with ease by starting with the right materials, including 4x8 3/4 sanded plywood, dowels, and a drill. Set up your workspace efficiently to guarantee a smooth workflow. Next, prepare the pegboard surface by determining the size, sanding it for a smooth finish, and painting it with a color that complements your workspace. Finally, add personalized touches like decorative trim, monograms, or functional accessories to make your pegboard unique and organized. With these steps, you'll be well on your way to crafting a pegboard wall that's both beautiful and functional - and there are even more tips and tricks to discover.
Key Takeaways
• Determine the ideal pegboard wall size based on available space and tool storage needs for a functional design.
• Prepare the 4x8 3/4 sanded plywood surface with fine-grit sandpaper and paint for a polished look.
• Add creative embellishments like decorative trim, stencils, or paint to make the pegboard visually appealing and unique.
• Incorporate functional accessories like bins, baskets, or hooks to ensure tools and supplies are organized and accessible.
• Balance functionality with design by considering the overall aesthetics of the workspace for an efficient and attractive pegboard wall.
Gather Essential Materials
What essential materials will you need to create a functional and organized pegboard wall?
For a successful project, you'll require a 4x8 3/4 sanded plywood as the base, along with dowels and a 2X4 for support.
Your tool arsenal should include a drill and an impact driver for efficient hole drilling and material handling.
Effective material selection is vital in project planning, as it directly impacts the overall functionality of your pegboard wall.
A well-planned workspace setup will also facilitate a smooth workflow.
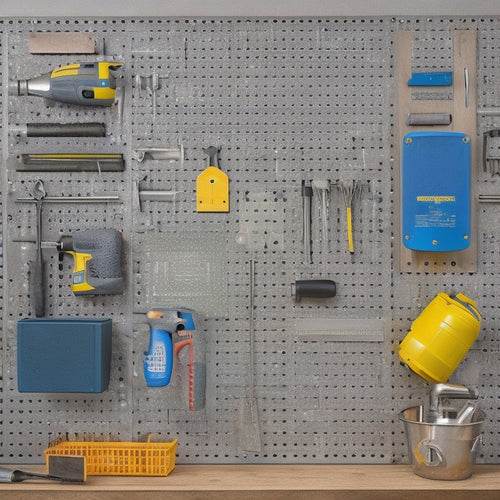
Prepare Your Pegboard Surface
Decide on the size of your pegboard wall by determining the space available for installation and the number of tools you want to store.
Next, confirm that your 4x8 3/4 sanded plywood is ready for preparation. Start by sanding the surface to create a smooth finish. Follow these sanding tips: use a fine-grit sandpaper and work your way up to a higher grit for a polished look.
Once sanded, consider your paint choices. Choose a color that complements your workspace and apply a coat or two according to the manufacturer's instructions. Allow the paint to dry completely before moving on to the next step.
A well-prepared surface is essential for a successful pegboard wall installation.
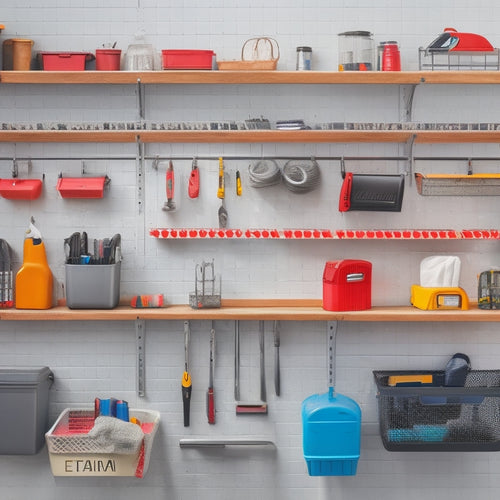
Add Final Touches and Decor
With your pegboard surface fully prepared, you're ready to add the final touches and decorate your pegboard wall to make it a functional and visually appealing addition to your workspace.
Now it's time to get creative and add those personalized touches that make your pegboard truly unique. Consider adding:
- Creative embellishments like decorative trim, stencils, or paint to give your pegboard a pop of color and personality
- Personalized touches like monograms, quotes, or fun designs that reflect your style and personality
- Functional accessories like bins, baskets, or hooks to keep your tools and supplies organized and within reach
Frequently Asked Questions
Can I Use MDF Instead of Plywood for the Pegboard Wall?
You can use MDF instead of plywood, considering its benefits like smooth surface and cost-effectiveness; however, weigh the pros and cons, as MDF may lack durability and moisture resistance, affecting your pegboard wall's overall performance.
How Do I Organize Tools on the Pegboard for Maximum Efficiency?
You visualize your tool organization strategy by clustering similar tools together and segmenting your pegboard into zones, allocating specific areas for frequently used tools, and grouping less-used ones, maximizing efficiency and accessibility.
Can I Add a Pegboard to an Existing Wall Without Damaging It?
When adding a pegboard to an existing wall, you'll need to use wall anchors to secure it without damaging the wall. First, locate the studs with a stud finder to guarantee a sturdy hold.
How Often Should I Clean and Maintain My Pegboard Wall?
As you revel in your newly organized space, you coincidentally realize the importance of maintenance. You should perform a daily inspection to remove dust and debris, and schedule a seasonal refresh to deep clean and reorganize your pegboard wall.
Are There Any Safety Precautions When Using Pegboards With Heavy Tools?
When working with pegboards, you'll want to take into account tool weight and load capacity to guarantee safe usage. Always check the pegboard's maximum weight limit to avoid accidents, and distribute heavy tools evenly to prevent overload.
Related Posts
-
Small Storage Bins to Maximize Shelf Space
When maximizing shelf space, you want to make the most of every inch. Small storage bins are the answer, but choosing...
-
3 Simple Steps to a Garage Tool Wall You'll Love
To create a garage tool wall you'll love, start by planning the space, taking inventory of your tools, and measuring ...
-
How to Hang a Pegboard in 5 Easy Steps
You'll hang a pegboard in 5 easy steps by first preparing the wall, ensuring it's sturdy and free of obstructions. Ne...


