Streamline Your DIY Projects With Key Storage Hacks
You're tired of wasting time searching for the right key in your cluttered toolbox or workspace. To streamline your DIY projects, start by categorizing keys based on frequency of use and project types, and utilize creative storage solutions like pegboards and key holders. Assign unique colors to keys for visual identification, and label them with corresponding uses or purposes. Organize your toolbox by purging unused tools and categorizing them by function or project type. You're just a few hacks away from maximizing your productivity - discover how to optimize your pegboard space and create a functional key rack that'll take your DIY game to the next level.
Key Takeaways
• Categorize keys by frequency of use and project type to quickly access the right key for your DIY project.
• Use creative storage solutions like pegboards, key holders, and color-coding to visually identify and organize your keys.
• Label keys with corresponding uses or purposes and store a photo of labeled keys for easy reference on devices.
• Designate a home for each key and use dividers or containers to keep them organized and prevent clutter.
• Install key racks vertically or utilize narrow spaces to maximize storage capacity and streamline your DIY projects.
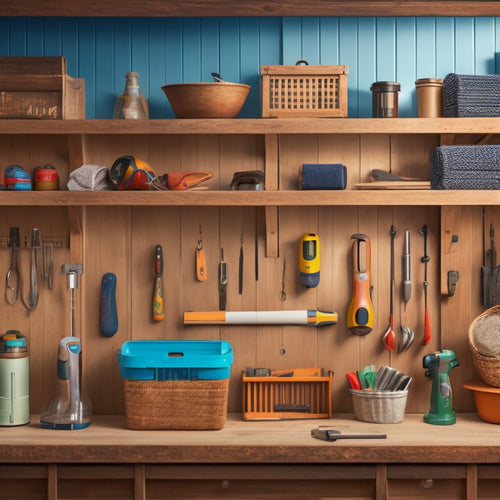
Essential Key Storage Tips
Mastering the art of key storage starts with organizing your keys by categorizing them into frequently used, occasionally used, and seasonal keys. This makes it easier to access the right one when you need it. This simple step will save you time and frustration in the long run.
As you're categorizing, think about the types of projects you work on and the keys you need for each one. This will help you determine which keys to store together and which ones to keep separate.
When it comes to DIY key organization, get creative with your storage solutions. Use a pegboard with hooks, a key holder with separate compartments, or even a repurposed picture frame with tiny hooks. The key is to find a system that works for you and your unique workspace.
Organize Your Toolbox Effectively
To maximize your DIY productivity, start by purging your toolbox of unused or broken tools and supplies, and then categorize the remaining items into groups based on their function, frequency of use, or project type. This will help you identify what you need and what you can get rid of, making it easier to find what you need when you need it.
Here are some tool organization ideas to get you started:
-
Designate a home for each tool: Assign a specific spot in your toolbox or workspace for each tool, making it easy to find and put back.
-
Use dividers and compartments: Separate your tools into categories using dividers or compartments, keeping similar tools together.
-
Label and sign everything: Clearly label each tool and compartment, and consider adding signs or tags to help you quickly identify what's inside.
DIY Key Holder Ideas
You can create a spot for your keys in your DIY workspace by crafting a key holder that keeps them organized, visible, and easily accessible. This simple project will save you time and frustration when searching for misplaced keys.
With a few basic materials, you can create a functional and stylish key holder that suits your workspace aesthetic. Consider a creative display that showcases your keys in a decorative tray or a wooden board with unique hooks. You can use metal or wooden dowels, or even repurpose old coat hooks to create a one-of-a-kind key holder.
Add a personal touch by engraving or painting your keys' corresponding labels. For a more rustic look, attach your hooks to a reclaimed wood board or a vintage window frame. Whatever design you choose, make sure it's easy to install and fits your workspace's available space.
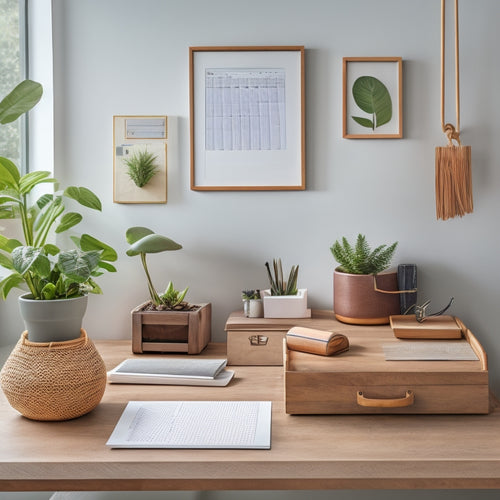
Declutter Your Workspace Fast
Five minutes a day is all it takes to maintain a clutter-free workspace, and it starts with a simple habit of putting things back in their assigned spots. By implementing quick decluttering techniques, you'll be able to focus on your DIY projects without distractions.
Efficient workspace organization is key to maximizing your productivity and minimizing stress.
Here are a few ways to get started:
-
Designate a 'launching pad' near your workspace where you'll place essential tools and materials, keeping them within easy reach.
-
Use minimalist storage solutions like bins, baskets, or hooks to keep items off the floor and out of the way.
-
Set up a 'done' box where you'll place completed tasks, helping you stay on top of your progress and feel a sense of accomplishment.
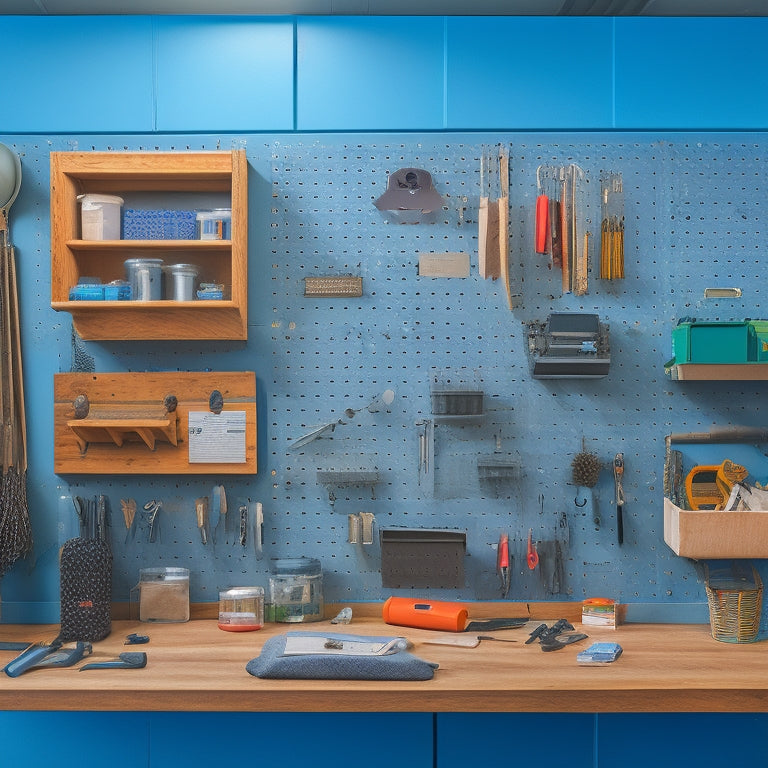
Optimize Your Pegboard Space
Daily, you're likely reaching for the same key tools and materials on your pegboard, so it's crucial to optimize this space for maximum efficiency. A well-organized pegboard layout can save you time and energy, allowing you to focus on your DIY projects.
Start by grouping similar items together, such as hammers, screwdrivers, and pliers, and place them in easy-to-reach locations. Consider investing in pegboard accessories like bins, baskets, and hooks to store small items like nuts, bolts, and screws. This will keep your workspace clutter-free and prevent lost or misplaced parts.
Next, think about the frequency of use for each item. Place your most-used tools and materials in prime locations, and reserve less accessible areas for less frequently used items. By optimizing your pegboard space, you'll reduce frustration and increase productivity.
Key Storage for Small Spaces
When you're dealing with limited square footage, finding a spot to stash your keys can be a real challenge. That's why you need clever key storage solutions that won't clutter up your tiny space.
Compact Storage Containers
Organize your tiny entryway or cluttered closet with compact storage containers that maximize vertical space and keep your keys within easy reach. These clever storage solutions are perfect for small spaces, allowing you to make the most of every inch.
By using compact storage containers, you'll create a more streamlined and organized area that's both functional and visually appealing.
Here are a few ideas to get you started:
- Install a wall-mounted key holder with small compartments for added storage
- Use stackable plastic bins to store keys, mail, and other small items
- Place a compact storage ottoman in your entryway to store keys, gloves, and other essentials
With compact organization, you'll be able to find what you need quickly and easily, saving you time and reducing stress. Plus, these storage solutions are easy to install and can be customized to fit your unique needs and style.
Hidden Shelf Solutions
By incorporating hidden shelf solutions into your DIY project, you can cleverly conceal key storage in small spaces, keeping your essentials out of sight while maintaining easy access. This is particularly useful in areas like entryways, mudrooms, or compact apartments where every inch counts. Consider installing a secret compartment behind a decorative mirror or a sliding panel that reveals a hidden shelf.
You can also create camouflage storage by designing a shelf that blends seamlessly with the surrounding decor, making it nearly invisible. For instance, you could build a shelf that looks like a wainscoting panel or a decorative trim. This will allow you to store small items like keys, mail, or knick-knacks without cluttering the surrounding area.
Another option is to repurpose an existing piece of furniture, like an ottoman or a coffee table, to include hidden storage compartments. By getting creative with hidden shelf solutions, you can maximize your small space while keeping your belongings organized and within reach.
Vertical Space Savers
You can further optimize your small space by leveraging vertical areas, such as walls and doors, to create clever key storage solutions that don't take up valuable floor or shelf space. By doing so, you'll free up more room for other essential items and maintain a clutter-free environment.
Here are some ideas to get you started:
-
Install hanging hooks on the back of a door or on a wall, perfect for hanging keys, bags, or accessories.
-
Add wall shelves with built-in key holders or small trays to keep your keys organized and within reach.
-
Utilize adhesive key strips or magnetic key holders on the side of a cabinet or fridge, providing a convenient spot to store your keys.
Labeling Keys for Easy Access
Now that you've got your keys stored away, it's time to take it to the next level by making them easily identifiable.
You'll be amazed at how a simple labeling system can save you time and frustration when you need to find a specific key.
Key Identification System
With a dozen keys jingling in your pocket or purse, finding the right one can be a frustrating exercise in trial and error. You've probably wasted valuable time searching for the correct key, only to realize it was in your hand the whole time.
That's why implementing a key identification system is essential for efficient key organization and storage solutions.
Here are a few scenarios that might sound familiar:
-
You're standing in front of a locked cabinet, rummaging through your keychain, hoping to stumble upon the right key.
-
You're trying to open your toolbox, but you can't seem to find the appropriate key amidst the clutter.
-
You're at the door, fumbling with your keys, wishing you'd a better way to identify which one opens it.
Color-Coded Organization
By assigning a unique color to each key using labels, stickers, or paint, you can create a visual system that lets you pinpoint the correct key in an instant. This color-coded labeling system is an efficient storage solution that saves you time and reduces frustration. With a quick glance, you'll know exactly which key belongs to which lock, making it easier to manage your DIY projects.
Here's an example of how you can organize your keys using color-coded labeling:
| Key Type | Color Code | Description |
|---|---|---|
| House keys | Red | Main door, back door, garage |
| Tool keys | Blue | Wrench, pliers, screwdriver |
| Cabinet keys | Green | Kitchen, bathroom, office |
| Padlock keys | Yellow | Shed, fence, gate |
| Car keys | Purple | Car ignition, trunk, door |
Quick Reference Guide
Create a quick reference guide by labeling each key with its corresponding fasten or purpose, allowing you to instantly identify which key goes where. This simple yet effective tip will save you time and frustration when working on your DIY projects. No more digging through a jumbled mess of keys or trying to remember which key opens which cabinet.
Here's how you can create your quick reference guide:
-
Use a label maker to attach a small label to each key, indicating what it's used for (e.g., 'front entrance,' 'tool storage,' or 'cabinet 3').
-
Organize your keys on a pegboard or in a designated key holder, grouping similar keys together (e.g., all the keys for your outdoor projects in one section).
-
Take a photo of your labeled keys and store it on your phone or computer for easy reference when you're away from your workshop.
Toolbox Organization Methods
You'll likely find that your toolbox quickly becomes a jumbled mess if you don't implement some intentional organization methods. Without a system in place, it's easy to waste time searching for the right tool or, even worse, misplacing expensive equipment.
To avoid this chaos, start by categorizing your tools into groups like hand tools, power tools, and fasteners. Then, assign a designated spot for each group within your toolbox. This will make it easy to find what you need when you need it.
Consider using dividers or small containers to separate your tools and keep them organized. You can also label each section to make sure you and others can quickly identify where everything goes.
For larger tools or equipment, consider investing in garage storage solutions like pegboards or shelves. This will keep your toolbox clutter-free and provide a safe place to store heavier items.
Key Rack Installation Hacks
When it comes to installing a key rack, you'll want to contemplate the mounting options that work best for your space, from screws to adhesive strips.
You'll also want to master hidden screw techniques to keep your installation looking sleek and polished.
Mounting Options Explained
With a vast array of mounting options available, figuring out how to install your key rack can be a challenging task, but understanding the different types will make the process much smoother. You'll want to contemplate the weight and size of your key rack, as well as the type of surface you're mounting it on.
Here are some popular mounting options to ponder:
-
Ceiling hooks: perfect for hanging key racks near entryways or in high-traffic areas
-
Wall brackets: provide a sturdy and secure hold for your key rack, especially on drywall or plaster
-
Adhesive hooks or magnetic strips: great for renters or those who don't want to make holes in the wall; these options are easy to remove and won't damage the surface
Hidden Screw Techniques
Secure your key rack discreetly by mastering hidden screw techniques, which let you install your key storage solution without exposing unsightly screws or holes. This will create a sleek and polished look that's perfect for any room.
To achieve this, you'll want to use camouflage screws or stealthy fasteners that blend in with the surrounding material. Here are some popular options:
| Technique | Description | Best For |
|---|---|---|
| Countersinking | Drill a hole for the screw head to sit flush with the surface | Wood, drywall |
| Screw caps | Use decorative caps to cover the screw heads | Metal, plastic |
| Hidden clips | Attach the key rack using concealed clips | Glass, mirrors |
| Magnetic mounts | Use strong magnets to hold the key rack in place | Metal doors, fridges |
| Adhesive strips | Attach the key rack using strong adhesive strips | Painted walls, tiles |
Space-Saving Design Tips
By optimizing your key rack's design, you can cleverly carve out extra space in even the most cramped areas, making it easier to stash your keys without sacrificing style or functionality. With a little creativity, you can turn any spot into a functional and stylish key storage solution.
Here are some space-saving design tips to get you started:
-
Vertically inclined: Install your key rack on a wall or door, using wall-mounted hooks or adhesive strips to maximize vertical space.
-
Narrow nooks: Utilize narrow spaces, such as between wall studs or inside a cabinet door, to create a slim key rack that won't take up valuable real estate.
-
Multi-functional magic: Combine your key rack with other DIY storage solutions, like a mail organizer or coat hook, to create a space-saving station that keeps your entryway clutter-free.
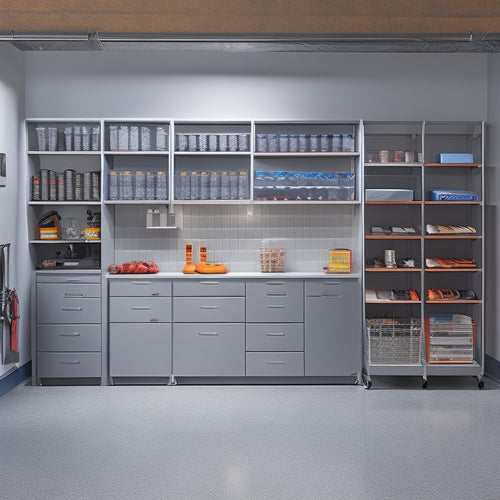
Maximizing Vertical Storage
As you're planning your key storage system, take advantage of often-wasted wall space to double or even triple your storage capacity. By going vertical, you'll free up precious floor and counter space for more important tasks.
Start by utilizing ceiling hooks to hang baskets filled with small items like nuts, bolts, and screws. This keeps them organized, visible, and easily accessible.
Next, install wall shelves to create additional storage for larger items like power tools, paint cans, or bulky supplies. Add storage bins or baskets to these shelves to categorize and contain smaller items within. This will help maintain a clutter-free workspace and reduce stress.
Remember to label each bin and shelf to make sure you can quickly find what you need. By maximizing your vertical storage, you'll create a more efficient, organized, and productive workspace that'll help you tackle DIY projects with ease.
Frequently Asked Questions
How Do I Prevent Keys From Getting Scratched or Damaged in Storage?
To prevent keys from getting scratched or damaged in storage, you'll want to focus on key protection and clever storage solutions. Try using soft pouches, velvet-lined cases, or dividers to keep your keys organized and scratch-free.
Can I Use a Key Storage System for Non-Tool Keys Like House Keys?
"Unlock the door to home organization and bolster your security measures by using a key storage system for your non-tool keys, like house keys, which offers convenience features like easy access and labeling."
Are There Key Storage Solutions for Outdoor or Garage Workshops?
You'll find key storage solutions perfect for outdoor or garage workshops, offering weatherproof options to protect your keys from the elements, and clever garage workshop key organization systems to keep you working efficiently.
How Do I Keep My Key Storage System From Becoming Cluttered Again?
Like a phoenix rising from the ashes, your newly organized key storage system can quickly revert to chaos if you don't maintain it. You'll avoid clutter by embracing minimalist organization with key hooks and compact storage via key cabinets.
Can Key Storage Systems Be Customized for Left-Handed Users?
You can absolutely customize key storage systems for left-handed users, incorporating ergonomic designs that cater to their unique needs, ensuring left-handed accessibility and making your DIY projects more inclusive and user-friendly.
Related Posts
-
Best Organizing Tools for a Clutter-Free Space
You're on a mission to change your cluttered space into a peaceful oasis, and you're looking for the best organizing ...
-
Building a Garage Storage System With Built-Ins
You're about to build a garage storage system with built-ins that fits your unique needs, starting by evaluating your...
-
What Tools Do I Need for a DIY Wall Organizer
You'll need a variety of tools to complete a DIY wall organizer project. Essential measuring tools include a tape mea...


