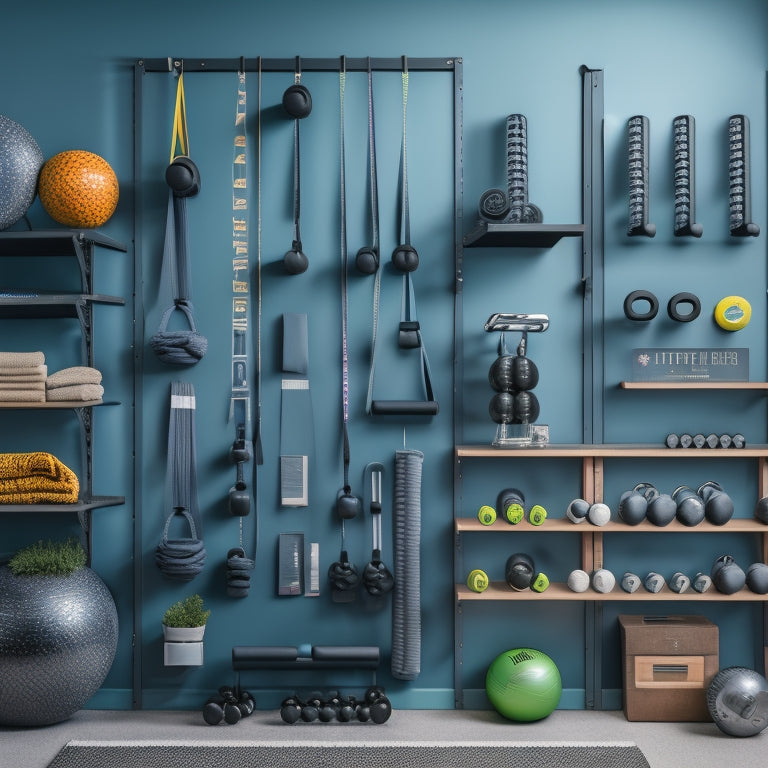
Why a Pegboard Is Essential for a Home Gym
With a pegboard, you can revolutionize your home gym by maximizing storage capacity, streamlining your workout routine, and saving time searching for gear. You'll enjoy incredible customization options, easily swapping out equipment or adding new pieces as needed. By choosing the right pegboard size and layout, you'll optimize your space, reduce clutter, and create a more efficient workout environment. From heavy-duty hooks to small accessories, a well-designed pegboard system will transform your home gym - and that's just the starting point for creating a space that's tailored to your fitness goals.
Key Takeaways
• A pegboard system maximizes storage capacity, keeping equipment organized and easily accessible for an efficient workout routine.
• It streamlines your workout by saving time searching for gear, allowing you to focus on your fitness goals.
• A pegboard provides incredible customization options, allowing you to tailor your storage to your specific needs and preferences.
• With a pegboard, you can easily swap out equipment or add new pieces as your fitness journey evolves.
• It helps maintain a clutter-free home gym, creating a more inviting and motivating space to exercise.
Benefits of a Pegboard System
With a pegboard system, you can maximize your home gym's storage capacity and functionality, streamlining your workout routine and keeping your equipment organized and within easy reach. This means you'll spend less time searching for misplaced gear and more time focusing on your fitness goals.
Plus, a pegboard system offers incredible customization options, allowing you to tailor your setup to your specific needs and preferences. Whether you're a weightlifter, yogi, or cardio enthusiast, you can configure your pegboard to accommodate your favorite equipment and accessories.
This flexibility also extends to your workout routine, as you can easily swap out equipment or add new pieces as your fitness goals evolve. With a pegboard system, you'll enjoy the freedom to experiment with new exercises and routines, keeping your workouts fresh and engaging.
Choosing the Right Pegboard Size
When choosing the right pegboard size for your home gym, you'll want to start by measuring your available space. Consider the area where you plan to mount the pegboard, taking into account any obstacles or limitations that might impact its size.
Measuring Your Space
You'll need to carefully measure the space where you plan to install your pegboard to guarantee a perfect fit. Consider the room layout and any space constraints that might affect the size of your pegboard. Take note of any obstacles, such as windows, doors, or electrical outlets, that might limit the available wall space.
Measure the width, height, and depth of the area to determine the maximum size of your pegboard. Don't forget to account for any surrounding features, like molding or trim, that might impact the fit. You might need to adjust the size of your pegboard to accommodate these elements.
Board Thickness Matters
Selecting the appropriate pegboard thickness is crucial, as it directly impacts the overall functionality and aesthetic of your home gym setup. You'll want a board that's sturdy enough to hold your equipment, yet not so thick that it's cumbersome or overwhelming. Typically, pegboards range from 1/4 inch to 1 inch in thickness, with the most popular options being 1/2 inch or 3/4 inch.
When choosing the right thickness, take into account your material selection. For example, if you opt for a wooden pegboard, you may want a thicker board to ensure durability. On the other hand, a metal pegboard can be thinner and still maintain its strength.
Your aesthetic preferences also play a role. A thicker board may provide a more industrial look, while a thinner board can create a sleeker, more modern appearance.
Ultimately, the right thickness will depend on your specific needs and preferences. Take the time to carefully ponder your options, and you'll end up with a pegboard that not only functions well but also looks great in your home gym.
Essential Tools for DIY Installation
To get started with your pegboard installation, gather the necessary tools, including a drill, level, and stud finder, to guarantee a secure and level mounting. You don't want your pegboard to fall off the wall, do you? Having the right tools will make the installation process smoother and ensure a professional-looking result.
Here are the essential tools you'll need:
-
Power Drill: A reliable power drill is a must-have for drilling holes into your wall. Make sure it's cordless for more flexibility.
-
Socket Set: A socket set will come in handy for securing the pegboard to the wall. Choose a set that includes various socket sizes to accommodate different screw sizes.
-
Level: A level ensures your pegboard is straight and even. You can choose between a traditional bubble level or a laser level for more accuracy.
- Stud Finder: A stud finder helps you locate the wall studs, which is important for a secure installation. This tool will save you time and frustration.
With these tools in your arsenal, you'll be ready to tackle the installation process like a pro. Remember to follow the manufacturer's instructions and take your time to ensure a successful installation.
Measuring and Marking the Wall
Now that you have your tools ready, it's time to measure and mark the wall where your pegboard will go. You'll need to take precise measurements to guarantee a perfect fit, and that's where your wall measurement tools come in handy.
Wall Measurement Tools
Measure your wall carefully with a trusty tape measure, ensuring it's level and plumb to get accurate readings for your pegboard installation. You want to make sure you're getting precise measurements, as even a slight miscalculation can throw off the entire setup.
When it comes to measuring your wall, don't rely on guesswork. Instead, invest in some reliable tools to get the job done. Here are a few essentials to take into account:
-
Laser levels: These handy tools project a level line or dot onto your wall, ensuring your measurements are spot-on.
-
Measuring apps: Many smartphones have built-in measuring apps that use the camera to calculate distances and angles.
-
Stud finders: These devices help you locate the wall studs, which is essential for a secure pegboard installation.
- Long-level tools: These extendable levels allow you to measure longer distances with ease.
Accurate Marking Techniques
You'll want to transfer your precise wall measurements onto the wall itself using accurate marking techniques to guarantee a successful pegboard installation. This is where many DIY enthusiasts go wrong, so take your time and get it right. Measuring mistakes can be costly and frustrating, so it's crucial to use the right tools and techniques.
One effective method is to use laser guidance to project a level line onto the wall. This guarantees your marks are straight and accurate. You can also use a combination square to verify your measurements and make precise marks.
Here's a summary of the key marking techniques to keep in mind:
| Technique | Description | Benefit |
|---|---|---|
| Laser Guidance | Projects a level line onto the wall | Ensures straight and accurate marks |
| Combination Square | Verifies measurements and makes precise marks | Reduces measuring mistakes |
| Pencil Marks | Lightly marks the wall with a pencil | Allows for easy adjustments and corrections |
Level Surface Verification
Accuracy demands that you confirm the wall's surface is level before marking it, as even the slightest deviation can throw off your entire pegboard installation. You don't want to end up with a wonky pegboard that looks unprofessional and affects the functionality of your home gym.
To guarantee a level surface, you'll need to use the right tools. Here are four essential items to get the job done:
-
Bubble levels: These traditional tools are simple yet effective in determining if a surface is level.
-
Laser beams: More advanced laser levels can project a level line across the wall, making it easier to mark a straight line.
-
A sturdy ladder: You'll need a reliable ladder to reach the top of the wall and take precise measurements.
- A pencil and marker: Once you've confirmed the surface is level, use a pencil to lightly mark the wall and a marker to create a more visible line.
Installing the Pegboard Hooks
Now that your pegboard is securely mounted, it's time to attach the hooks that will hold your equipment and accessories. This is where the fun begins! You'll want to strategically plan your hook placement to guarantee easy access to your gear. Consider grouping similar items together, like all your resistance bands or yoga accessories.
Before you start drilling, make sure you follow proper drill safety guidelines. Wear safety goggles and keep loose clothing tied back to avoid any accidents. Use a level to make sure your hooks are straight and a pencil to mark the spot where you'll drill.
Here's a suggested layout for your hooks:
| Hook Type | Recommended Placement |
|---|---|
| Heavy-duty hooks | Bottom row for heavy weights or kettlebells |
| Standard hooks | Middle rows for resistance bands or accessories |
| Small hooks | Top row for small items like jump ropes or gloves |
| Specialty hooks | As needed for specific equipment, like a pull-up bar |
Remember to space your hooks evenly and leave enough room for future additions. Take your time, and you'll be all set to start organizing your home gym in no time!
Maximizing Storage Space Efficiently
With your hooks securely in place, it's crucial to think strategically about how to maximize the storage space on your pegboard, ensuring every piece of equipment and accessory has a designated home. You want to make the most of your space, so it's vital to think vertically and utilize every inch.
Here are some tips to keep in mind:
-
Optimize shelf space: Use stackable bins and containers to store smaller items like resistance bands, jump ropes, and workout gloves.
-
Corner utilization: Make the most of those often-wasted corner spaces by using corner shelves or baskets to store larger items like kettlebells or medicine balls.
-
Group similar items together: Store all your strength training equipment, like dumbbells and weight plates, in one area, and your cardio gear, like jump ropes and exercise bikes, in another.
- Keep frequently used items accessible: Hang your most frequently used items, like yoga mats and jump ropes, at eye level for easy access.
Frequently Asked Questions
Can I Install a Pegboard in a Rental Property?
"You can install a pegboard in a rental property, but make sure it's rent-friendly and gets your landlord's approval first; removable adhesive strips or command hooks can be a great solution to avoid damaging walls."
Are Pegboards Suitable for Outdoor or Garage Gyms?
"Imagine your outdoor gym as a sailboat, buffeted by wind and rain. You need a pegboard that's anchored like a rock, with weather-resistant materials and outdoor mounting options that can withstand the elements, so you can focus on your fitness journey, not maintenance."
Can I Customize My Pegboard With Non-Standard Hooks?
You can definitely customize your pegboard with non-standard hooks, choosing from various hook materials like stainless steel or aluminum, and even creating custom designs that fit your unique workout style and space constraints.
How Do I Prevent the Pegboard From Damaging My Walls?
'Like a anchor in a storm, you'll want to secure your pegboard to avoid damaging those walls, sweetheart! Use wall anchors and a trusty stud finder to guarantee a sturdy installation that'll keep your gear - and your walls - safe and sound.'
Can I Use a Pegboard for Storing Non-Gym Equipment?
You can totally repurpose your pegboard for tool organization and craft supplies! You'll be surprised how easily it can hold hammer hooks, paintbrushes, and even baskets for yarn or beads, keeping your workspace tidy and efficient.
Related Posts
-
Large Wall Hooks to Maximize Garage Space
You can effectively double your garage's storage capacity by installing large wall hooks that keep items off the floo...
-
Advantages of a Pegboard System in Your Garage
You can instantly alter your garage into a more organized, efficient, and productive space by installing a pegboard s...
-
Portable Tool Chest Essentials
When stocking your portable tool chest, you'll want to prioritize essential hand tools like hammers, tape measures, a...


