
Smart Tool Organization Systems for Homeowners
You're ready to upgrade your tool organization system! Start by evaluating your tool collection needs, considering space constraints, and categorizing tools by frequency of use. Choose storage options that maximize space, accessibility, and functionality, and utilize clear labels and shelf dividers. Optimize your workshop layout with an ergonomic design, corners with shelves, and a tool zone for frequently used tools. Implement a maintenance routine with daily tasks and regular tool inspections to guarantee long-term effectiveness. Now, discover how to take your tool organization to the next level by exploring expert strategies for labeling, categorizing, and storing your tools efficiently.
Key Takeaways
• Assess your tool collection, considering frequency of use, space constraints, and categorization to determine the most effective storage system.
• Choose storage options that maximize space, accessibility, and functionality, using clear labels and dividers for easy tool retrieval.
• Design an ergonomic workshop layout that optimizes workflow, utilizing corners, shelves, and hooks for extra storage and easy access.
• Establish a tool labeling and categorization system that is flexible, clear, and readable, with a color-coding system for quick identification.
• Implement regular maintenance routines and tool inspections to ensure long-term effectiveness and prevent wear and tear issues.
Assess Your Tool Collection Needs
Before creating a tool organization system, take stock of your tool collection to determine what you have, what you need, and how you'll use each item. This step is essential in understanding your tool organization needs.
You might be surprised at what you find - perhaps you've fallen into the trap of tool hoarding, accumulating more gadgets than you actually use. Or, you might discover that you're lacking essential tools for common tasks.
As you assess your collection, consider the space constraints in your home. If you live in a small apartment, you'll need to prioritize the most frequently used tools and find a system that works within your limited space.
Take note of the tools you use daily, weekly, and monthly, and categorize them accordingly. This will help you decide which tools to store in easy-to-access locations and which can be tucked away in harder-to-reach spots.
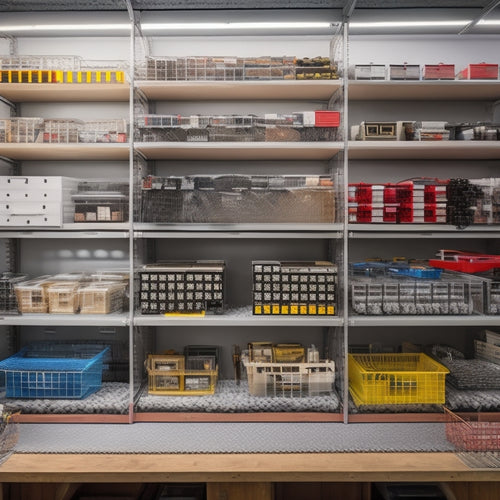
Choose the Right Storage Options
With your tool collection assessed and categorized, it's time to choose storage options that maximize space, accessibility, and functionality, ensuring you can quickly locate and retrieve the tools you need.
You'll want to take into account the size, shape, and weight of your tools when selecting storage solutions. Storage bins with clear labels are great for storing small items like fasteners, nuts, and bolts. Label each bin so you can easily identify what's inside.
For larger tools, think about using shelf dividers to separate and organize them. This will prevent clutter from building up and make it easier to find what you need.
When picking storage options, think about the frequency of use for each tool. Store your most frequently used tools in easy-to-reach locations, and less frequently used tools towards the back or on higher shelves.
Consider using stackable storage units or wall-mounted shelves to optimize vertical space and keep your workshop floor clear.
Optimize Your Workshop Layout
You'll want to strategically position your workstations, benches, and storage units to create a logical workflow that streamlines your projects and minimizes walking distances. This will help you stay focused and avoid wasting time searching for tools or moving around obstacles.
To optimize your workshop layout, consider the following:
-
Ergonomic Layout: Design your workspace to fit your body, not the other way around. Position tools and materials at comfortable heights to reduce strain and fatigue.
-
Corner Utilization: Don't let corners go to waste! Install shelves, hooks, or bins to maximize storage in these often-overlooked areas.
-
Create a Tool Zone: Designate a specific area for frequently used tools, keeping them within easy reach to reduce unnecessary movement.
- Workstation Flow: Arrange your workstations in a logical sequence, allowing you to move efficiently from one task to the next.
Label and Categorize Tools Effectively
As you set out to label and categorize your tools effectively, you'll need to develop a system that makes sense for your specific needs.
You'll want to start by creating a tool classification system that groups similar tools together, making it easy to find what you need when you need it.
Tool Classification System
Establishing a tool classification system allows you to label and categorize your tools effectively, making it easier to locate and retrieve the right tool for the task at hand. This system guarantees that you're not wasting time searching for a specific tool, and instead, you can focus on completing the task efficiently.
To create a well-structured tool classification system, consider the following:
-
Tool Hierarchy: Create a hierarchical system where tools are categorized into broad groups, such as 'power tools' or 'hand tools'. This helps you to narrow down your search to a specific category.
-
System Flexibility: Make sure your system is flexible enough to accommodate new tools or changes in your tool collection. This assures that your system remains relevant and effective over time.
-
Tool Functionality: Categorize tools based on their functionality, such as 'drilling' or 'measuring'. This helps you to quickly identify the right tool for a specific task.
- Tool Type: Group tools by their type, such as 'saws' or 'wrenches'. This helps you to locate tools with similar characteristics.
Labeling Best Practices
When categorizing and labeling your tools, organize them in a logical and consistent manner to make certain that you can quickly identify and access the right tool for the job. This means using a clear and readable label font, such as Arial or Helvetica, in a size that's easy to see from a distance. You'll also want to choose a font color that contrasts well with the label's background, making it easy to read even in low-light conditions.
To take your labeling to the next level, consider implementing a color-coding system. This can be as simple as using different colored labels or stickers to categorize tools by type, such as red for power tools and blue for hand tools. You can also use color-coding to indicate the tool's intended use, such as yellow for gardening tools and green for woodworking tools.
Categorization Methods
You can categorize your tools into functional groups, such as fastening tools, cutting tools, or measuring tools, to create a logical and intuitive organization system. This approach allows you to quickly locate the tool you need, saving time and reducing frustration.
To take your categorization to the next level, consider these methods:
-
Color Coding: Assign a specific color to each category or group, making it easy to identify where a tool belongs. For example, you can use red labels for power tools and blue labels for hand tools.
-
Priority Grouping: Organize your tools by priority, placing the most frequently used tools in easy-to-reach locations. This ensures that you can quickly access the tools you need most.
-
Task-Based Grouping: Group your tools by the task they're used for, such as a 'plumbing' group or a 'carpentry' group. This approach helps you prepare for specific projects and tasks.
- Frequency-Based Grouping: Organize your tools by how often you use them, with the most frequently used tools at the front and center of your organization system.
Implement a Maintenance Routine
When setting up your tool organization system, it's crucial to establish a maintenance routine to guarantee it remains effective over time.
You'll want to schedule daily tasks, such as putting away tools after use, to prevent clutter from building up again.
Daily Task Scheduling
Establishing a daily task scheduling routine helps homeowners prioritize tool organization and maintenance tasks, guaranteeing their tools remain in good working condition and are easily accessible when needed. By implementing a daily routine, you'll stay on top of tasks, avoid procrastination, and maintain a sense of control over your tool collection.
To get started, follow these simple steps:
-
Task Prioritization: Identify the most critical tasks that need attention, such as cleaning tools, restocking supplies, or performing routine maintenance.
-
Set aside dedicated time for each task using Time Blocking, making sure you allocate sufficient time for each activity.
-
Create a schedule that works for you, taking into account your daily routine, available time, and energy levels.
- Review and adjust your schedule regularly to make certain it remains relevant and effective.
Regular Tool Inspection
Every three months, a thorough tool inspection is essential to identify and address any signs of wear and tear, preventing minor issues from escalating into costly repairs or even safety hazards. By incorporating regular inspections into your maintenance routine, you'll be able to detect tool wear early on and take corrective action. This can include cleaning, lubricating, or replacing worn parts to prevent further damage.
Here's a suggested inspection frequency for common tools:
| Tool | Inspection Frequency |
|---|---|
| Hand tools (e.g., hammers, pliers) | Every 3 months |
| Power tools (e.g., drills, saws) | Every 2 months |
| Lawn and garden equipment | Every 1 month |
| Safety gear (e.g., hard hats, goggles) | Every 6 months |
| Fasteners and accessories (e.g., screws, bolts) | Every 4 months |
Seasonal Tool Storage
Organizing your tools by season helps you prioritize maintenance, making sure that out-of-season tools are properly stored, and those in use are easily accessible. This approach prevents clutter, reduces wear and tear, and saves you time in the long run.
As you switch from one season to another, take the opportunity to assess your tool collection and store items that won't be needed for a while.
Here are some seasonal storage tips to get you started:
-
Winter Preparation: Store summer tools like lawn mowers, gardening shears, and patio furniture in a dry, protected area. Bring out winter tools like shovels, snow blowers, and ice melt.
-
Holiday Decorations: Designate a specific storage bin or container for holiday decorations, lights, and ornaments. Label it clearly so you can find what you need quickly next year.
-
Seasonal Change: When winter ends, swap out winter tools for summer ones. Store winter gear in a dry place to prevent rust and damage.
- Spring Cleaning: Use the spring season to clean and maintain your tools, and to organize your storage space to make sure everything has a designated place.
Consider Vertical Storage Solutions
By installing shelving or cabinets that maximize your garage's or workshop's vertical space, you can create a more efficient storage system that keeps tools and equipment within easy reach. This approach allows you to take advantage of often-wasted space, freeing up floor space for more important tasks.
Consider incorporating wall-mounted cabinets, which can be customized to fit your specific needs. For instance, you can designate a cabinet for hand tools, another for power tools, and a third for miscellaneous supplies.
To further optimize your vertical storage, think about pegboard optimization. By strategically placing pegboards on walls or the back of cabinets, you can hang frequently used tools, making them easily accessible. This not only saves space but also reduces clutter and keeps your workspace organized.
Additionally, labeling each pegboard section can help you quickly identify where each tool is stored, saving you time and frustration. By implementing these vertical storage solutions, you'll be able to find what you need quickly, work more efficiently, and enjoy a more organized workspace.
Frequently Asked Questions
How Do I Prevent Tools From Getting Rusty in Storage?
Like a precious gem, your tools need protection from rust. You prevent rust by storing them in dry environments and using rust inhibitors, like silicone sprays or wax, to create a barrier against moisture.
Can I Use a Pegboard With Heavy Tools Like Drills?
You can use a pegboard with heavy tools like drills if you choose a sturdy pegboard design with reinforced hooks and strategically place your drill in a lower position to maintain balance and prevent sagging.
Are Tool Organizers Compatible With All Workshop Bench Types?
You'll be relieved to know that most tool organizers are compatible with various bench materials, such as wood, metal, or composite. Look for modular designs that adapt to your unique workshop setup, ensuring a seamless integration.
How Often Should I Clean My Tool Storage Containers?
You should clean your tool storage containers every 1-2 months to prevent dust accumulation, which can lead to rust and damage; regular Container Maintenance guarantees your tools stay in top condition and prolongs container lifespan.
Can I Customize Tool Organizers to Fit Unique Tools?
You can definitely customize tool organizers to fit your unique tools, thanks to tool adaptation options that offer a custom fit; simply measure your tools, then choose or modify an organizer to guarantee a snug, secure fit.
Related Posts
-

Storage Bins for Shelves to Keep Clutter at Bay
You're looking for a way to keep your shelves organized and clutter-free, and storage bins are the perfect solution t...
-
10 Essential Steps for Small Parts Bin Storage
To optimize your small parts bin storage, start by defining your storage needs and goals, considering factors like av...
-

Must-Try Bike Storage Ideas in Small Spaces
You're tired of sacrificing precious living space to store your bike, especially in small homes where every square fo...


