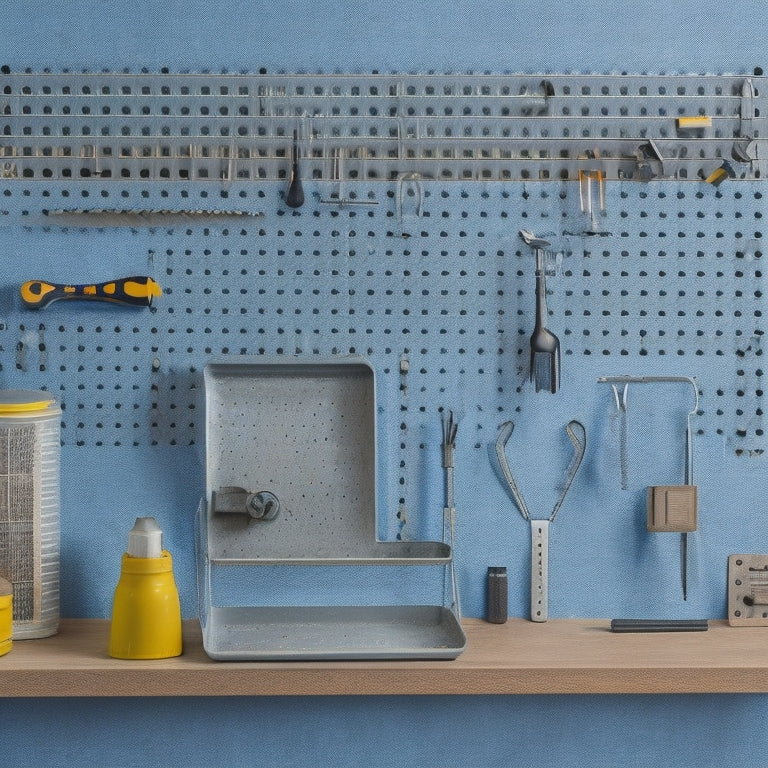
Pegboard Design Plans for Efficient Tool Storage
You're about to transform your cluttered workshop or garage into a haven of productivity with a pegboard design that streamlines your tool storage and organization. Start by investing in essential accessories like bins, hooks, and dividers to categorize your tools. Assign a home for each tool, using labels and signs for easy identification. Maximize your vertical space by installing pegboard panels from floor to ceiling and utilizing creative tool holders. With a well-planned pegboard, you'll be able to quickly find the tools you need, reducing downtime and increasing efficiency. Now, take the next step towards optimizing your workshop's storage capacity.
Key Takeaways
• Invest in tool holders like bins and hooks to maximize storage capacity and accessibility on your pegboard.
• Categorize and separate tools by frequency of use, task, or type to streamline workflow and reduce clutter.
• Implement dividers and labels to create a visually appealing and easy-to-navigate pegboard design.
• Consider the "golden zone" when placing frequently used tools in easy-to-reach locations to boost productivity.
• Optimize your pegboard's vertical space by using hooks, bins, and shelves to store tools and accessories efficiently.
Essential Pegboard Accessories
When setting up your pegboard, invest in these essential accessories to maximize storage capacity and make the most of your tool organization system.
You'll want to start with must-have tool holders, such as bins for small parts, hooks for hanging tools, and trays for organizing accessories. These pegboard accessory ideas will help you create an efficient layout that saves you time and reduces clutter.
Consider adding a pegboard shelf or basket to store items like safety glasses, earplugs, or tool manuals. This will keep them easily accessible while keeping your workspace organized.
You can also use pegboard dividers to separate your tools into categories, making it easier to find what you need when you need it. By incorporating these organization tips into your design, you'll be able to create a customized pegboard that meets your specific needs and helps you serve others more efficiently.
With these essential accessories, you'll be well on your way to creating a tool organization system that streamlines your workflow and maximizes your productivity.
Tool Organization Strategies
When designing your pegboard, you'll want to ponder tool organization strategies that tackle clutter, optimize storage, and make the most of your workshop space. By implementing effective solutions, you'll be able to quickly find the tools you need, saving you time and frustration.
Now, let's explore three key points to help you achieve a well-organized workspace: controlling tool clutter, finding effective storage solutions, and optimizing your workshop space.
Tool Clutter Control
You've likely experienced the frustration of wasted time searching for a misplaced tool in a cluttered workspace, which is why implementing effective tool organization strategies is essential for maximizing productivity. A well-organized workspace not only saves time but also reduces stress and increases efficiency.
To take control of tool clutter, start by decluttering your garage or workshop. Sort tools into categories, and purge any broken or unnecessary items. Next, assign a home for each tool, making sure it's easily accessible and visible. Use labels and signs to identify where each tool is stored. Implementing a 'one in, one out' policy will also help maintain your newly organized space.
As a DIY home improvement enthusiast, you understand the importance of having a functional workspace. By incorporating storage solutions, such as pegboards, bins, and baskets, you can keep your tools organized and within reach. When designing your pegboard, consider the tools you use most frequently and place them in easy-to-access locations.
With a little planning and effort, you can transform your cluttered workspace into a haven of productivity, allowing you to focus on what matters most – completing your projects efficiently and effectively.
Effective Storage Solutions
Your pegboard design should incorporate a mix of storage solutions, such as bins, baskets, and hooks, to maximize vertical space and keep frequently used tools within easy reach. This will help you achieve efficient garage organization and create a more functional workspace.
By using a combination of storage solutions, you can categorize and separate your tools, making it easier to find what you need when working on DIY projects.
Consider using bins and baskets to store small items like screws, nuts, and bolts, while reserving hooks for larger tools like hammers and saws. You can also use dividers to separate your tools into categories, such as woodworking, automotive, or electrical.
This will help you quickly identify where each tool is stored, saving you time and reducing frustration.
Optimize Workshop Space
To optimize your workshop space, categorize tools by frequency of use and store them accordingly, reserving prime real estate for your most-used items. This will help you work more efficiently and reduce clutter. Consider implementing DIY shelving solutions or installing mobile workbenches to maximize your space. These flexible storage options allow you to reconfigure your workshop as needed.
| Tool Category | Storage Solution |
| Frequently Used | Prime shelving space, easy access |
| Occasionally Used | Middle shelves or bins, moderate access |
| Rarely Used | Top or bottom shelves, limited access |
| Heavy Tools | Mobile workbenches with sturdy storage |
| Small Accessories | Pegboards with labeled hooks and bins |
Maximizing Vertical Space
By strategically positioning pegboard panels from floor to ceiling, you can capitalize on every inch of available wall space and create a highly organized tool storage system. This approach maximizes vertical space, allowing you to store more tools in a smaller area.
Consider installing vertical tool racks that can hold long-handled tools, such as brooms, shovels, and rakes. These racks can be mounted at different heights to accommodate tools of varying lengths.
To further optimize your pegboard design, incorporate creative tool holders that can be mounted on the wall or overhead. For instance, you can use wall-mounted solutions like bins, baskets, or hooks to store smaller items like nuts, bolts, and screws.
Overhead storage options, such as overhead bins or baskets, can be used to store infrequently used tools or seasonal equipment. By utilizing these storage solutions, you'll be able to free up floor space, reduce clutter, and create a more efficient workshop.
Customizable Pegboard Designs
Design your pegboard to fit your unique needs and tool collection by choosing from a variety of pegboard sizes, styles, and accessories that can be mixed and matched to create a customized storage system. This flexibility allows you to personalize your pegboard to suit your specific requirements, ensuring efficient tool organization and maximizing your workspace.
With custom pegboard designs, you can:
-
Choose from various pegboard materials, such as wood, metal, or plastic, to suit your workshop's aesthetic and durability needs.
-
Select from a range of pegboard sizes, from compact to large, to fit your available wall space and tool collection.
-
Add accessories, like bins, hooks, and trays, to create a tailored storage solution that caters to your specific toolset.
Pegboard Layout Best Practices
When creating your pegboard layout, prioritize frequently used tools and place them in easy-to-reach locations to optimize your workflow. This will save you time and energy in the long run.
Consider the pegboard aesthetics and incorporate color coordination to create a visually appealing layout. Group similar tools together, such as all screwdrivers or pliers, to make them easily accessible.
Optimize your pegboard tool arrangement by placing heavier tools at the bottom and lighter ones at the top. This will prevent the pegboard from becoming top-heavy and reduce the risk of tools falling off.
Additionally, arrange tools in a way that allows you to access them without having to stretch or bend. This will reduce fatigue and improve your overall working experience.
Tool Storage for Small Shops
As you design your pegboard for a small shop, you'll need to prioritize the essential tools you use most frequently. By selecting the right tools and arranging them in a space-saving layout, you'll maximize your shop's limited space.
Now, let's explore the key considerations for essential tool selection and layout tips to optimize your pegboard's efficiency.
Essential Tool Selection
Set up your small shop for success by identifying the necessary tools that'll get the job done efficiently, and prioritize their storage accordingly. You'll want to focus on the essentials that'll be used frequently, rather than cluttering your space with unnecessary items.
By doing so, you'll be able to maintain your tools more effectively, ensuring they remain in good condition and continue to serve you well.
To get started, consider the following essential tools:
-
Drills and drivers: These versatile tools are used for a wide range of tasks and are a staple in any small shop.
-
Hand tools: Pliers, wrenches, and screwdrivers are must-haves for any project, and should be easily accessible.
-
Measuring and marking tools: A tape measure, level, and marker are pivotal for accurate measurements and markings.
Space-Saving Layout Tips
Your pegboard's layout is essential to maximizing storage in your small shop, so prioritize frequently used tools in easy-to-reach locations. This will save you time and energy when working on projects.
Consider the 'golden zone' - the area between your waist and shoulder height - for storing your most-used tools. This will reduce bending and straining, making your work more comfortable and efficient.
To make the most of your pegboard's space, use creative hooks to store items like cords, hoses, and accessories. You can also utilize vertical organization by installing hooks or bins at different heights to store items like sandpaper, drill bits, or other small parts. This will keep your tools organized and within reach, while keeping your work surface clutter-free.
Remember to leave some space between your tools to prevent overcrowding and make it easier to find what you need.
Hanging Tool Essentials
Hang your most frequently used tools within easy reach by incorporating a well-planned pegboard into your workspace. This won't just save you time but also boost your productivity. When it comes to tool organization, a pegboard is an important component, particularly for DIY projects and home improvement tasks.
Here are three must-hang tools to get you started:
-
Hammer: A hammer is a fundamental tool that's always in demand. Hang it in a convenient spot, making it easy to access when you need it.
-
Tape measure: A tape measure is another frequently used tool that's often misplaced. By hanging it on your pegboard, you'll make sure it's always within reach.
-
Level: A level is vital for ensuring your DIY projects are accurate and even. Hang it on your pegboard, and you'll be able to tackle any project with confidence.
Pegboard Add-Ons for Efficiency
By incorporating clever pegboard add-ons, you can multiply your storage capacity and streamline your workflow, freeing up more time for the tasks that matter.
One of the most significant advantages of pegboard customization is the ability to tailor your storage to your specific toolset. By adding hooks, bins, and trays, you can create a system that caters to your unique needs, ensuring that every tool has its designated place. This level of organization enables you to quickly locate the tools you need, reducing downtime and increasing tool efficiency.
Additionally, add-on versatility allows you to adapt your pegboard to different projects and tasks, making it an indispensable asset in your workshop. With the right add-ons, you can convert your pegboard into a thorough workstation, complete with built-in measuring tools, cord organizers, and more.
Common Tool Storage Mistakes
As you optimize your pegboard with clever add-ons, it's equally important to sidestep common tool storage mistakes that can undermine your organization efforts and hinder productivity. A well-designed pegboard is only as effective as the tool organization strategy behind it.
Here are three common mistakes to avoid:
-
Insufficient clutter control: Failing to regularly purge unnecessary items can lead to a cluttered workspace, making it difficult to find the tools you need when you need them.
-
Inadequate storage solutions: Using storage solutions that aren't tailored to your specific toolset can result in wasted space and decreased workspace efficiency.
-
Poor tool categorization: Not grouping similar tools together can make it challenging to locate specific tools, ultimately decreasing productivity.
Advanced Pegboard Configurations
You can elevate your pegboard's functionality by incorporating advanced configurations that maximize storage capacity and streamline tool access. One way to do this is through pegboard customization, where you design creative layouts that cater to your specific tool needs.
Consider a hybrid pegboard that combines fixed and adjustable hooks, allowing you to store tools of varying sizes and shapes.
Innovative tool organization solutions can also be achieved by using pegboard accessories like bins, baskets, and trays. These add an extra layer of storage and keep small items organized and within reach.
You can also incorporate a 'zone' approach, where you dedicate specific areas of the pegboard to specific tasks or tool types. This helps maintain a logical workflow and reduces clutter.
Frequently Asked Questions
Can I Mount a Pegboard on a Concrete or Brick Wall?
You can mount a pegboard on a concrete or brick wall by installing brackets and using anchors specifically designed for your wall type, ensuring a secure hold and preventing damage to the wall or pegboard.
How Do I Prevent Pegs From Falling Out Over Time?
To prevent pegs from falling out over time, you'll want to guarantee proper installation with secure screwing or anchoring, and maintain your pegboard by regularly checking and tightening peg retention, guaranteeing long-term durability.
Are Pegboards Suitable for Heavy-Duty Industrial Tools?
You're wondering if pegboards can handle the weight of a thousand hammers (okay, maybe not that many, but you get the idea!). For heavy-duty industrial tools, look for pegboards with a high weight capacity and durable construction to guarantee tool organization and accessibility.
Can I Use a Pegboard for Storing Small Parts and Accessories?
You can definitely use a pegboard for storing small parts and accessories, making it easy to organize hardware and manage small item storage, keeping everything within reach and freeing up valuable workspace.
Are Pegboards Compatible With Metric-Sized Tools and Accessories?
You can easily adapt pegboards to metric tools and accessories by customizing the layout and using metric-compatible hooks and bins, ensuring efficient organization and maximizing storage space for your specific needs.
Related Posts
-
Choosing the Right Stacked Storage Bins
When choosing the right stacked storage bins, you'll want to evaluate your storage needs, considering inventory types...
-
Top Wrench Tool Box Sets for Every Mechanic
You're looking for high-quality wrench tool box sets that cater to your specific needs as a mechanic. From top-rated ...
-
Must-Try Bike Storage Ideas in Small Spaces
You're tired of sacrificing precious living space to store your bike, especially in small homes where every square fo...


