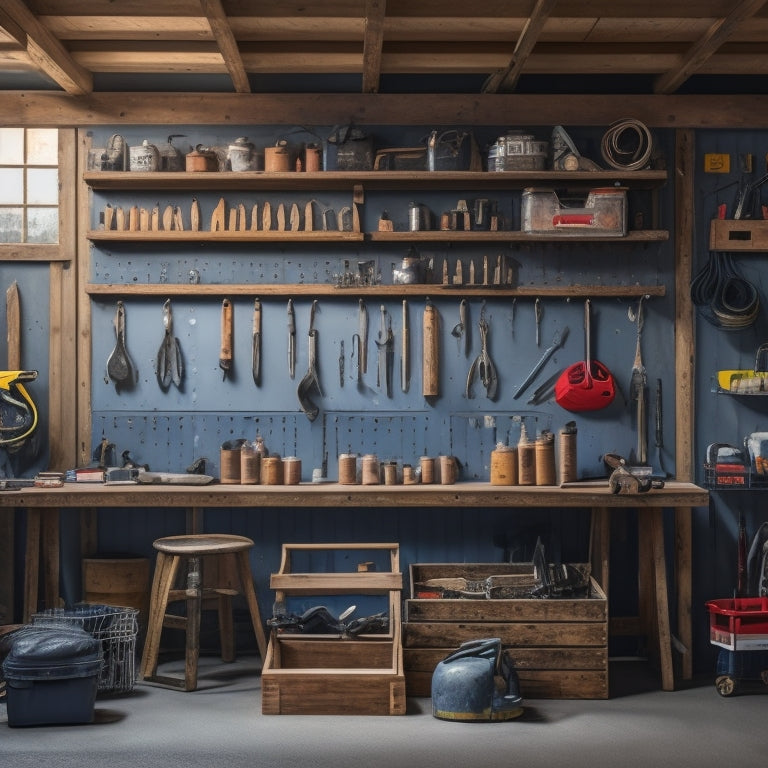
Hanging Tools on a Wall to Maximize Your Space
To maximize your space by hanging tools on a wall, start by identifying a wall with high traffic and proximity to your workbench. Verify the wall can support the weight of your tools and avoid hanging them near doors or windows. Use tool hooks, corner shelves, and pegboards to create a custom tool board that organizes your tools by category, such as hand tools, power tools, and fastening tools. Select the right fasteners for your wall material and distribute the weight of heavy tools evenly across the board. By following these steps, you'll create a safe and efficient system that frees up floor space and enhances productivity, and there's even more you can do to take your tool organization to the next level.
Key Takeaways
- Identify wall space with high traffic and consider wall orientation, proximity to workbench, and structural integrity to support tool weight.
- Maximize corner space by installing corner shelves, securely attaching them to the wall, and using tool hooks and pegboards for efficient storage.
- Organize tools by category, grouping similar items together, and prioritize layout for frequently used tools to enhance accessibility.
- Select the best fasteners for the wall material, considering weight limits and load distribution ratings, and install them into wall studs for maximum hold.
- Distribute weight evenly across the hanging system, using sturdy hooks, and regularly inspect for wear and stability to ensure safe usage.
Choosing the Right Wall Space
Identify the wall space that gets the most traffic in your workshop or garage - this is where you'll want to hang your most frequently used tools.
Consider the wall orientation: a south-facing wall may receive direct sunlight, which could cause tools to fade or become brittle over time. East- or west-facing walls receive gentler morning or afternoon light, making them ideal for hanging tools.
Next, take note of the wall's proximity to your workbench or main workspace. You'll want to hang your tools within easy reach to minimize walking distances and reduce tripping hazards.
Ascertain the wall is structurally sound and can support the weight of your tools. Avoid hanging tools near doors, windows, or other areas where they might get knocked or damaged.
Selecting the Best Fasteners
How much weight will your tools put on the wall? This is an essential question to answer before selecting the best fasteners for the job. You'll want to choose fasteners that can handle the weight of your tools while guaranteeing the safety of everyone around.
Consider the anchoring types, such as screws, anchors, or hooks, and their compatibility with your wall material. Fastener materials like steel, aluminum, or nylon also play a significant role in weight limits. For instance, steel screws can hold more weight than nylon anchors.
When selecting fasteners, look for weight limits and load distribution ratings. The screw size and drill bit used will also impact the installation technique and overall safety.
Always install fasteners into a wall stud to guarantee maximum hold. Remember, tool safety is paramount, so don't compromise on the quality of your fasteners.
Organizing Tools by Category
You'll want to start organizing your tools by category, which means grouping similar tools together.
Begin by categorizing your tools into broad groups, such as automotive, electrical, or plumbing, to create a logical system.
Then, segregate your hand tools, like pliers, screwdrivers, and wrenches, into separate sections within each category.
Tool Category Grouping
Sort your tools into categories to access the full potential of your hanging tool organization system.
This approach enables you to group similar tools together, making it easier to find what you need when you need it.
-
Power tools: drills, saws, and sanders
-
Hand tools: wrenches, pliers, and screwdrivers
-
Fastening tools: hammers, nails, and screws
- Measuring tools: tape measures, levels, and calipers
Hand Tool Segregation
Within the hand tool category, separate your wrenches, pliers, and screwdrivers into subgroups based on their functions or characteristics. This is where tool type classification comes in. For instance, group all your wrenches together, then further subdivide them into socket wrenches, adjustable wrenches, and fixed wrenches.
Do the same with pliers, separating needle-nose pliers from slip-joint pliers.
When organizing screwdrivers, categorize them by drive type (flathead, Phillips, hex) and then by size. This segregation will allow you to quickly locate the tool you need, reducing the time spent searching and minimizing the risk of misplacing tools.
Aisle spacing considerations are vital when hanging tools on the wall. Verify there's enough space between each subgroup to prevent overcrowding and allow for easy access.
You should be able to comfortably reach each tool without having to stretch or strain, promoting a safe working environment. By following these steps, you'll create a well-organized hand tool section that saves you time and reduces the risk of accidents.
Utilizing Vertical Space Effectively
You'll want to start by evaluating your wall space to identify areas that aren't being used efficiently.
Next, measure your walls to determine the maximum capacity for hanging tools, ensuring you use every inch wisely.
Optimize Wall Space Now
How can you resist the urge to clutter your workspace when you're surrounded by tools and equipment? It's tempting to leave them scattered around, but that's a recipe for disaster.
Instead, optimize your wall space now to create a safe and efficient working environment.
To maximize your wall space, follow these steps:
-
Plan your layout: Decide which tools you use most frequently and group them together. Consider the weight and size of each tool to guarantee you're not overloading your wall.
-
Choose the right hooks: Select hooks that are sturdy and suitable for the weight of your tools. You can use screw-in hooks, adhesive hooks, or even repurposed materials like old pallets.
-
Hang tools by frequency of use: Place your most frequently used tools at eye level, and less frequently used tools above or below.
- Leave space for growth: Don't overcrowd your wall. Leave some space for future tool additions or changes to your workflow.
Use Every Inch Wisely
Your workshop's vertical space is a significant asset, and using it wisely can make a substantial difference in your productivity and organization. To maximize space efficiency, start by evaluating the layout of your wall. Identify areas where you can hang tools without obstructing your workflow or creating tripping hazards.
Consider the weight and size of the tools you'll be hanging, ensuring that the wall anchors can support the load. Next, choose the right hanging system for your tools. You can use pegboards, hooks, or bins, depending on the type of tools you need to store.
Install the system at a comfortable height, allowing you to easily access the tools without straining. Don't forget to leave some space between each tool to maintain wall aesthetics and prevent clutter.
Maximize Storage Capacity
Maximize storage capacity by strategically placing frequently used tools within easy reach. This allows you to quickly access the tools you need, reducing wasted time and increasing productivity.
To maximize storage capacity, consider the following:
-
Install tool boards: Mount tool boards on your wall to hang tools like hammers, screwdrivers, and pliers. This keeps them organized and easily accessible.
-
Use pegboards: Pegboards are great for hanging smaller tools like wrenches, sockets, and hand saws. You can customize the layout to fit your specific tool collection.
-
Hang bins and containers: Suspend bins and containers from the ceiling or a shelf to store items like nuts, bolts, and other small parts.
- Utilize corner space: Make the most of often-wasted corner space by installing a corner shelf or carousel to store items like toolboxes, buckets, or other equipment.
Creating a Custom Tool Board
Set up a dedicated workspace by building a custom tool board that caters to your specific needs. This allows you to optimize tool accessibility, visibility, and space efficiency.
Begin by deciding on a custom design that suits your aesthetic appeal and functional requirements. Choose a material that complements your wall finishes, guaranteeing a seamless integration. Consider the weight and size of your tools when selecting the material and hardware for your board.
For DIY projects, consider using a pegboard or a slatwall system, which offer flexibility and ease of installation. Confirm hardware compatibility by checking the type of screws or hooks required for your tools.
When planning your layout, prioritize frequently used tools and group similar items together. This will enhance tool accessibility and reduce clutter.
Hanging Heavy Tools Safely
Now that you've designed and built your custom tool board, it's time to focus on hanging your heavy tools safely and securely.
When it comes to hanging heavy tools, safety guidelines are essential to prevent accidents and damage.
To guarantee weight distribution is even, follow these steps:
-
Distribute weight evenly: Space heavy tools apart to prevent overloading one section of the board.
-
Use sturdy hooks: Choose hooks that can hold the weight of your tools, and make certain they're securely attached to the board.
-
Consider the weight limit: Calculate the total weight of your tools and verify your board can handle the load.
- Leave some slack: Leave a little slack in the hanging system to allow for slight movements or vibrations.
Maximizing Corner Space
Corner space often gets wasted in workshops, but with a little creativity, you can turn these areas into useful storage spots.
To maximize your corner space, start by installing corner shelves that are specifically designed for holding tools and supplies. These shelves come in various sizes and materials, so choose ones that fit your workshop's style and needs.
Make sure to securely attach them to the wall to prevent them from tipping over.
Next, employ tool hooks to hang items like hammers, screwdrivers, and pliers. You can install these hooks directly onto the wall or onto the corner shelves. This will keep your tools organized and within easy reach.
Additionally, consider adding a corner pegboard to hang larger items like saws and drills. This will help keep your floor clear and create a more organized workspace.
Labeling and Signage Options
Clarity is key to an organized workshop, and labeling and signage play an essential role in maintaining that clarity. When it comes to labeling and signage, you want to make certain that your tools are easily identifiable, even when they're hung on a wall. This not only saves you time but also prevents accidents that can occur when you're searching for the right tool.
Choose from various label types, such as:
-
Vinyl labels: durable and water-resistant, perfect for tools exposed to moisture.
-
Laminated labels: protected from tears and scratches, ideal for high-traffic areas.
-
Magnetic labels: easy to move or reposition, great for frequently used tools.
- Engraved labels: permanent and tamper-proof, suitable for high-security workshops.
Select sign materials that fit your workshop's style and needs, such as acrylic, aluminum, or PVC.
Consider the font size, color, and style to make certain your labels are easy to read from a distance.
Maintaining Your Tool Wall
Your tool wall is only as good as its maintenance. To guarantee it remains functional and safe, you'll need to commit to regular tool wall maintenance.
Start by setting a schedule for regular cleaning. Dust and dirt can accumulate quickly, making it difficult to find what you need and potentially causing accidents. Use a soft-bristled brush or cloth to wipe down the wall and tools, paying special attention to hooks and holders.
Next, inspect your tools and holders for damage or wear. Check for loose screws, frayed cords, or rusty parts. Replace or repair anything that's no longer safe to use.
This is also a good time to reorganize your tools, guaranteeing that the most frequently used items are easily accessible.
Frequently Asked Questions
Can I Hang Tools on a Wall With Plaster or Drywall Anchors?
You can safely hang tools on walls with plaster or drywall anchors, but first, ascertain drywall stability by checking for studs, and then choose the right plaster anchors for a secure hold, following manufacturer's instructions to avoid accidents.
How Do I Prevent Tools From Falling off the Wall Over Time?
Don't be that person whose tools come crashing down, okay? To guarantee tool stability, you're gonna wanna choose the right anchors for your wall materials, like using sleeve anchors for plaster and toggle bolts for drywall, and then, you know, actually follow the instructions.
Are There Any Specific Tools That Shouldn't Be Hung on a Wall?
When deciding what tools to hang, you'll want to take into account safety concerns and tool types. Avoid hanging heavy, sharp, or bulky tools that can fall and cause harm, like circular saws, axes, or heavy machinery, and opt for lighter, compact tools instead.
Can I Hang Tools on a Wall in a Rented Space or Apartment?
Did you know that 70% of renters worry about damaging their rental property? You can hang tools on a wall in a rented space if you check your rental regulations and take steps to minimize wall damage, like using removable adhesive strips or consulting your landlord.
How Often Should I Inspect and Maintain My Tool Wall Organization?
You should inspect your tool wall organization every 1-2 months, checking for loose hooks, worn-out bins, and tool damage, and perform maintenance tasks like tightening screws and cleaning the wall to guarantee a safe and efficient workspace.
Conclusion
You've conquered the ultimate DIY challenge: altering a cluttered mess into a well-oiled machine, where every tool has its designated spot, just like a surgeon's precision instruments. Now, your workshop echoes the efficiency of a Swiss clock, with each piece hanging in harmony, waiting to be summoned like a faithful servant. As you step back to admire your handiwork, remember, a well-organized tool wall is not just a practical solution, but a badge of honor, symbolizing your expertise over chaos.
Related Posts
-

Adjustable Modular Shoe Racks for Versatility
Adjustable modular shoe racks are your go-to solution for versatile and organized footwear storage. These racks maxim...
-

Storage Bins for Shelves to Keep Clutter at Bay
You're looking for a way to keep your shelves organized and clutter-free, and storage bins are the perfect solution t...
-
10 Best Tool Boxes for Every Budget and Job
You're looking for a tool box that fits your budget and job requirements. Whether you're a DIY enthusiast, electricia...


