DIY Shelving Organizer for Maximum Space
You're looking to create a DIY shelving organizer that maximizes your space, and with careful planning, you can craft a system that's both functional and visually appealing. Start by measuring your available space, noting constraints like electrical outlets and windows. Consider the perfect balance of shelf heights, depths, and proportions to store your items while maintaining a clean aesthetic. Choose durable materials that fit your style and budget, and build a sturdy frame that's both level and plumb. As you complete your shelving unit, add decorative touches and customized storage solutions to make it a design feature - and now, get ready to take your space to the next level.
Key Takeaways
- Measure available space accurately to ensure a customized shelving unit that integrates with intended items and display.
- Plan vertical space cleverly to maximize storage, balancing shelf proportion with surrounding furniture and weight distribution.
- Choose durable materials that match desired style and color scheme, considering eco-friendly options and maintenance requirements.
- Assemble the shelving unit carefully, prioritizing aesthetics and stability, and ensuring level and plumb alignment.
- Customize the shelving organizer with baskets, bins, and adjustable shelves to optimize storage and accessibility for maximum space.
Measuring Your Available Space
Measuring Your Available Space
You're about to create a DIY shelving organizer that maximizes your space, but first, you need to measure your available space accurately. Take out your tape measure and get ready to assess the area where you'll be installing your shelving unit.
Record the available dimensions of the space, including the width, height, and depth. Consider any space constraints, such as electrical outlets, windows, or doors, that may affect the design of your shelving unit.
As you measure, visualize how you want your shelving unit to fit into the space. Think about the items you'll be storing and how you want them to be displayed.
Make note of any obstructions or challenges that may arise during installation. With precise measurements, you'll be able to create a customized shelving unit that fits perfectly into your space, guaranteeing a safe and functional storage solution.
Choosing the Right Materials
With your precise measurements in hand, you're ready to select the perfect materials for your DIY shelving organizer. This is a vital step, as the right materials will guarantee your shelving unit is both functional and visually appealing.
When choosing wood types, take into account durability factors, weight capacity, and aesthetics considerations. For example, solid hardwoods like oak or maple are sturdy and attractive, while engineered woods like plywood or MDF are more budget-friendly.
Don't forget to reflect on eco-friendly options, such as reclaimed or sustainably sourced woods.
Remember to balance your budget constraints with your desired finish choices. A high-gloss finish may look stunning, but it may also be more expensive and require more maintenance.
Here are some key factors to keep in mind:
- Durability: Will your chosen material withstand the weight capacity and daily wear and tear?
- Aesthetics: Does the material fit your desired style and color scheme?
- Budget: Are you willing to splurge on high-end materials or opt for more affordable options?
- Maintenance: How much time and effort are you willing to dedicate to upkeep and repairs?
Building the Shelving Frame
You'll start building your shelving structure by deciding on a design that fits your space and style.
Consider the size, shape, and configuration of your shelves, as well as the type of hardware and supports you'll need.
With a clear plan in place, you can begin assembling the shelving unit, piece by piece, to create a sturdy and attractive framework.
Shelving Frame Design
As you commence on building the shelving frame, envision the sleek, sturdy structure that will soon house your prized possessions.
Your frame's design will set the tone for the entire shelving unit, so it's vital to prioritize both aesthetics and stability. A well-designed frame won't only provide ample space for storage but also guarantee the safety of your belongings.
To achieve a harmonious balance between shelving frame aesthetics and stability, consider the following key elements:
- Clean lines and minimal ornamentation for a modern, sleek look.
- Sturdy materials, such as solid wood or metal, to support heavy loads.
- Careful measurement and alignment to ascertain the frame is level and plumb.
- Reinforced joints and connections to prevent the frame from shifting or collapsing.
Shelving Unit Assembly
Now that you've nailed down the design of your shelving frame, it's time to bring it to life. Gather your assembly tools, including a drill, level, and wrench, to guarantee a sturdy build. Depending on your shelving unit type, you may need to attach legs, shelves, or cabinets. Follow the manufacturer's instructions for specific assembly requirements.
Begin by constructing the base of your shelving unit, using your level to verify it's even and plumb. Then, attach the shelves, making sure they're securely fastened to the frame.
If you're building a cabinet-style shelving unit, assemble the doors and drawers according to the manufacturer's instructions.
As you assemble your shelving unit, keep safety in mind. Wear protective gear, such as gloves and safety glasses, to prevent injury.
Make sure the unit is stable and secure before adding heavy loads. With careful planning and attention to detail, you'll have a beautiful and functional shelving organizer that maximizes your space.
Adding Shelves and Brackets
With your DIY shelving organizer's frame in place, it's time to add the shelves and brackets that will bring your storage vision to life. This is where you get to customize your shelving unit to fit your specific needs and style.
Choose from various shelf types, such as fixed, adjustable, or floating, to create a visually appealing and functional storage space.
When selecting bracket styles, take into account the weight capacity, durability, and aesthetic appeal. You'll want to verify that your shelves can hold the weight of your items while complementing your room's décor.
Here are some essential factors to take into account when choosing brackets:
- Weight capacity: Verify the brackets can support the weight of your items.
- Durability: Select brackets made from high-quality, rust-resistant materials.
- Style: Choose bracket styles that fit your room's aesthetic, such as modern, industrial, or traditional.
- Adjustability: Take into account brackets with adjustable heights to accommodate items of varying sizes.
Installing Back Panel Support
Behind your DIY shelving organizer's frame, a sturdy back panel provides essential support to guarantee your storage space remains stable and secure.
You'll want to choose from various back panel types, such as plywood, MDF, or even reclaimed wood, depending on your desired aesthetic and durability. Make certain the back panel is cut to fit snugly within the frame, leaving no gaps or weaknesses.
Next, install support bracing to reinforce the back panel. You can use wooden or metal brackets, or even DIY your own using screws and L-brackets.
Place them strategically along the back panel, making sure they're evenly spaced and securely attached. This added support will prevent the shelves from bowing or sagging under the weight of your stored items.
Remember to check the back panel's stability as you work, making any necessary adjustments to ensure it's level and plumb.
With a sturdy back panel and support bracing in place, you can confidently store your belongings, knowing your DIY shelving organizer is safe and secure.
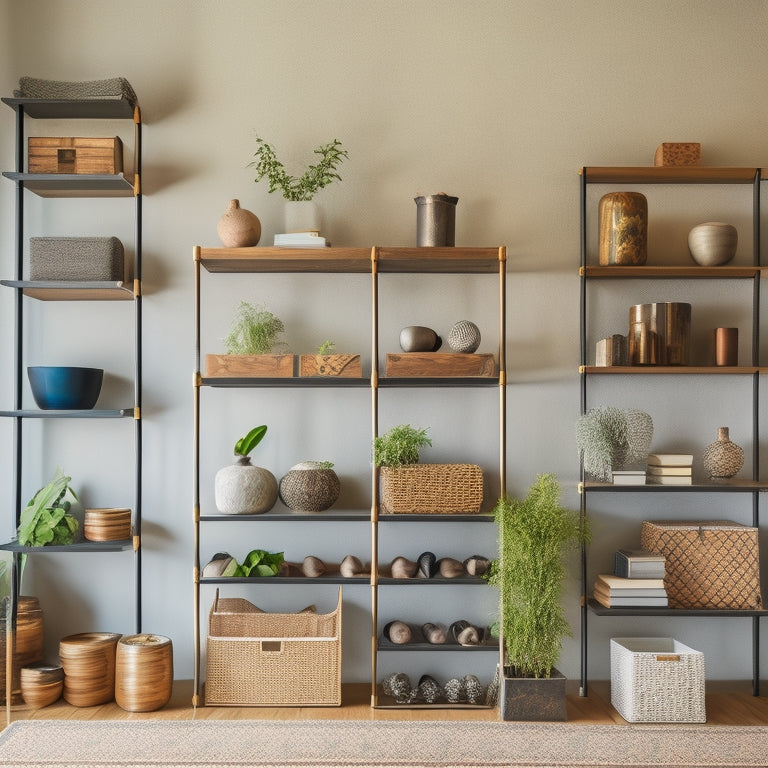
Customizing With Baskets and Bins
Frequently, the most visually appealing DIY shelving organizers are those that incorporate clever storage solutions, and customizing with baskets and bins is an excellent way to accomplish this.
By incorporating these elements, you can create a harmonious and functional space that meets your specific needs.
When selecting basket styles, consider the overall aesthetic you want to attain. Do you prefer rustic wicker, modern metal, or vintage-inspired fabric?
Choose bins and baskets that complement your shelving unit's design and color scheme. This will create a cohesive look that's both visually appealing and functional.
To maximize the effectiveness of your basket and bin organization, remember:
- Assign a home: Designate a specific basket or bin for each type of item, making it easy to find what you need.
- Label it: Clearly label each basket or bin to avoid confusion and guarantee everything stays organized.
- Keep it accessible: Place frequently used items in easy-to-reach baskets or bins, reducing strain and effort.
- Adjust as needed: Be prepared to adjust your basket and bin organization system as your storage needs change over time.
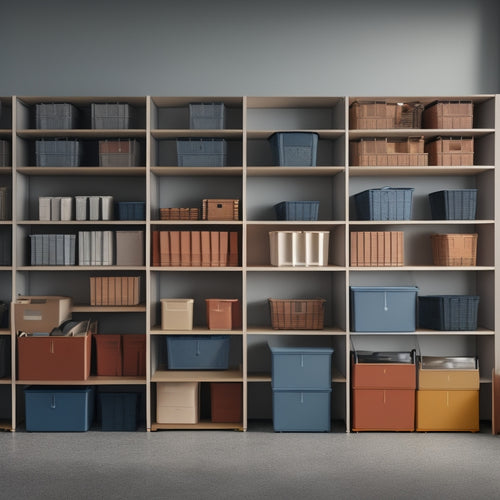
Maximizing Vertical Storage
You're now ready to tackle the often-wasted space above and below your shelves.
By strategically planning your vertical space, you can create a visually appealing and functional storage system that makes the most of your wall's real estate.
To start, take stock of the items you need to store and consider optimizing your shelf heights to accommodate them efficiently.
Vertical Space Planning
Your DIY shelving organizer's success relies heavily on clever vertical space planning, which allows you to maximize storage capacity while keeping your space visually appealing.
By making the most of your wall space, you can create a functional and stylish storage solution that doesn't compromise on aesthetics.
When planning your vertical space, consider the following key factors:
-
Scale: Verify your shelves are proportionate to the items you plan to store and the surrounding furniture.
-
Layering: Create visual interest by layering shelves of varying heights and depths.
-
Balance: Distribute weight and visual interest evenly to prevent the space from feeling cluttered or lopsided.
- Accessibility: Position frequently used items at a comfortable height to avoid straining or overreaching.
Optimize Shelf Height
Harmony in your DIY shelving organizer is achieved when every element, including shelf height, works in concert to create a visually stunning and functional space.
To optimize shelf height, you'll want to evaluate a shelf spacing strategy that accommodates the items you plan to store. This means adjusting shelf heights to fit specific items, rather than using a one-size-fits-all approach. For example, if you have a collection of large binders, you'll want to leave enough space between shelves to accommodate their height.
Similarly, if you have smaller items like books or decorative objects, you can adjust shelf heights to create a more compact storage solution.
When adjusting shelf heights, be mindful of safety considerations. Make sure shelves are securely attached to the wall to prevent them from tipping or collapsing.
Additionally, assess the weight capacity of each shelf and avoid overloading them with heavy items. By optimizing shelf height and spacing, you'll create a visually appealing and functional storage system that makes the most of your available space.
Finishing Touches and Decor
The final flourish of your DIY shelving organizer awaits - the finishing touches and decor that enhance your creation from functional to fabulous.
You've worked hard to optimize your shelf height and create a space-conscious design, now it's time to add some visual appeal.
-
Color coordination: Choose a palette that complements your room's decor and ties in with your storage bins and baskets. This will create a cohesive look and make your shelving unit a design feature.
-
Add decorative accents: Incorporate decorative brackets, trim, or molding to add a touch of sophistication. These small details can boost your shelving unit from basic to bespoke.
-
Bring in textures: Mix different textures such as wood, metal, and wicker to add depth and visual interest. This will also help to break up the monotony of a single material.
- Don't forget lighting: Consider adding under-shelf lighting or string lights to highlight your decorative accents and create ambiance.
Frequently Asked Questions
Can I Use Reclaimed Wood for a Unique Shelving Design?
You can absolutely use reclaimed wood for a one-of-a-kind shelving design, reaping benefits like eco-friendliness and rich history. Get creative with unique design ideas, like mixing textures or incorporating metal accents, while ensuring a sturdy, safe structure that showcases your personal style.
How Do I Prevent the Shelves From Sagging Over Time?
When designing your shelves, you'll want to choose sturdy shelf materials that can handle the weight. Guarantee proper load distribution by spacing supports evenly, and consider adding reinforcement brackets to prevent sagging over time, keeping your space both stylish and safe.
Are There Any Safety Considerations for High Shelving Units?
As you ascend to towering heights, remember the ancient wisdom of the pharaohs: stability is key. When building high shelving units, you'll want to guarantee weight limits aren't exceeded and consider sturdy mounting options to prevent catastrophic falls.
Can I Add Electrical Outlets to My DIY Shelving Unit?
When adding outlets to your shelving unit, you'll want to carefully plan shelf wiring and outlet placement to guarantee safe and convenient access to power, while maintaining a visually appealing and clutter-free space that meets your needs.
How Do I Clean and Maintain My Shelving Organizer?
You'll want to dust regularly, vacuum tight spaces, and spot-clean stains promptly to maintain your shelving organizer's sleek look. Use gentle cleaning techniques and follow maintenance tips to keep your unit safe, functional, and visually appealing.
Conclusion
You've built a DIY shelving organizer that's a marvel of efficiency, a modern-day Taj Mahal of storage. Just as the ancient Egyptians built pyramids to reach for the heavens, you've maximized your space, creating a vertical wonder that's both functional and beautiful. Now, stand back, admire your handiwork, and bask in the glory of your clutter-free domain. Your DIY shelving organizer is a triumph of form and function, a true work of art of space-conscious design.
Related Posts
-
Choosing the Right Stacked Storage Bins
When choosing the right stacked storage bins, you'll want to evaluate your storage needs, considering inventory types...
-

Heavy-Duty Commercial Rolling Shelving Racks
You need heavy-duty commercial rolling shelving racks that optimize your storage capacity, streamline operations, and...
-
Top Rolling Tool Box Drawers for Maximum Storage
When it comes to maximizing storage with rolling tool box drawers, you need a solution that combines durability, cust...


