DIY Garage Shelving System Installation
You're about to start your DIY garage shelving system installation project, and it's crucial to gather the necessary tools and materials, ensuring you have a tape measure, level, drill, and safety gear. Measure your garage space, evaluating storage needs and planning for future expansion. Prepare the walls by filling gaps and cleaning the surface for a strong bond. Assemble shelving units, installing wall brackets and building the frame, then add shelves and supports. Secure the shelving to walls, and finally, organize and maximize storage. Now that you've got the basics down, you're ready to tackle the specifics and optimize your garage space for maximum efficiency.
Key Takeaways
- Gather necessary tools, safety gear, and materials, ensuring ergonomic handle selection and material inspection for a successful installation.
- Measure the garage space accurately, assessing storage needs, shelving height, and future expansion possibilities for a well-planned layout.
- Prepare the walls by inspecting, cleaning, and drying the surface, and filling gaps for a smooth and secure installation.
- Assemble shelving units according to manufacturer's instructions, verifying level alignment, and using appropriate materials for the desired load capacity.
- Secure the shelving system to walls using suitable anchors, ensuring weight capacity verification and pilot hole drilling for a sturdy connection.
Gathering Essential Tools and Materials
To kick off your DIY garage shelving system project, you'll need to gather essential tools and materials. Start by collecting necessary tools, including a tape measure, level, drill, impact driver, and socket set.
Don't forget safety gear like gloves, safety glasses, and a dust mask. Tool selection tips include choosing tools with ergonomic handles for comfort and grip, and opting for cordless options for increased mobility.
When sourcing materials, contemplate the shelving system's design and functionality. Decide on the type of shelving you want, such as fixed or adjustable, and choose materials accordingly.
Material sourcing strategies include buying lumber from reputable suppliers, selecting durable and weather-resistant materials, and opting for pre-cut or pre-assembled components to save time.
Be certain to inspect materials for damage or defects before purchasing. Additionally, calculate the quantity of materials needed, considering the shelving system's dimensions and design specifications.
Having all the necessary tools and materials on hand will guarantee a smooth and efficient installation process.
Measuring and Planning the Space
With your tools and materials ready, you're prepared to tackle the next step: measuring and planning the space.
Take precise measurements of your garage's space dimensions to determine the best layout design. Consider your storage needs, including the size and weight of items you plan to store, to guarantee your shelving system can support the weight capacity.
Decide on the ideal shelving height, considering accessibility factors, such as ease of reach and clearance for vehicles or equipment. Think about future expansion, too, in case you need to add more shelves or storage units later.
Aesthetic choices, like the color and style of your shelving, should also influence your planning.
Make a sketch or drawing of your garage, noting the location of windows, doors, and any obstacles. This will help you visualize your layout and make adjustments as needed.
Preparing the Walls for Installation
Your garage walls are about to become the foundation of your DIY shelving system. Before you start drilling and screwing, it's vital to prepare them properly to guarantee a secure and sturdy installation.
Begin by inspecting the walls for any cracks, holes, or uneven surfaces. Use wall preparation techniques such as filling gaps with spackling compound and sanding rough spots to create a smooth surface.
Next, clean the walls using effective surface cleaning methods. Remove dirt, grime, and grease with a mixture of soap and water. Use a degreaser if necessary.
Allow the walls to dry completely before proceeding. This step is important to guarantee a strong bond between the wall and the shelving system.
Assembling the Shelving Units
Five sturdy shelving units await assembly, each comprising four walls, a top, and a bottom. Begin by unpacking the components and organizing them according to the manufacturer's instructions. Take note of the shelf material options, such as wood, metal, or composite, and make certain you have the necessary tools for assembly.
| Component | Description |
|---|---|
| Walls | 4 pieces, 2 sides, 1 back, 1 front |
| Top and Bottom | 2 pieces, provides structural integrity |
| Shelf | 1-5 pieces, depending on desired shelving configuration |
Follow the manufacturer's instructions to assemble the walls, top, and bottom of each shelving unit. Pay attention to weight capacity considerations, as overloading can lead to structural failure. Use a level to verify the units are properly aligned, and tighten all screws and bolts securely. As you assemble each unit, double-check the manufacturer's instructions to confirm you haven't missed any essential steps. Once all units are assembled, you'll be ready to move on to the next step: installing the wall brackets.
Installing the Wall Brackets
How securely will your DIY garage shelving system be fastened to the wall? This is a critical step in guaranteeing the stability and safety of your shelving system.
You'll need to choose the right bracket types for your wall materials. For drywall or plaster, use hollow-wall anchors or toggle bolts. For concrete or brick, use masonry anchors or screws. For metal studs, use self-drilling screws.
Begin by marking the spot where you want to install the wall bracket. Hold the bracket against the wall and use a level to verify it's straight. Drill pilot holes for the anchors or screws, then insert them into the wall. Screw the bracket into place, making certain it's securely fastened.
Repeat this process for each bracket, spacing them evenly apart according to your shelving system's design.
Remember to always follow the manufacturer's instructions for the specific type of bracket and anchor you're using.
And don't overload your shelving system – confirm the weight capacity of the brackets and anchors can handle the weight of the shelves and items you'll be storing.
Building the Shelving Frame
With all wall brackets securely in place, the next step is to build the shelving frame, which will provide the structure for your DIY garage shelving system.
Start by cutting four vertical posts to the desired shelf height, considering the load capacity you want to achieve. Use a miter saw or a circular saw to make precise cuts.
Next, cut the horizontal beams that will connect the vertical posts, confirming they're the same width as the wall brackets.
Assemble the frame by attaching the horizontal beams to the vertical posts using 3-inch screws. Make sure the corners are secure and the frame is level.
Use a carpenter's square to verify the frame is square and plumb.
If you're building a multi-tiered shelving system, repeat the process for each level, ensuring to space the vertical posts evenly.
Remember to follow the manufacturer's instructions for the recommended load capacity and shelf height to guarantee your DIY garage shelving system is safe and functional.
Adding Shelves and Supports
You'll now configure your shelves to fit your specific storage needs, choosing from options like fixed shelves, adjustable shelves, or a combination of both.
To guarantee stability, you'll assemble the support structure, which typically consists of vertical supports, horizontal beams, and shelf pins.
With your support structure in place, you'll be ready to attach your shelves and start storing your garage items.
Shelf Configuration Options
One essential aspect of designing a DIY garage shelving system is determining the best shelf configuration to meet your specific storage needs.
You'll need to take into account shelf depth, load capacity, and shelf materials to guarantee your shelves can hold the weight of your stored items. For instance, if you plan to store heavy tools or equipment, you'll need shelves with a higher load capacity and sturdy materials like steel or wood.
Adjustable heights are also vital, as they allow you to customize your shelves to fit items of varying sizes. Corner shelving units can help maximize storage space in tight areas, while modular designs provide flexibility and ease of expansion.
Don't forget to take into account aesthetic considerations, such as the color and finish of your shelves, to guarantee they blend with your garage's overall design.
When configuring your shelves, remember to distribute weight evenly to prevent sagging or collapse. This is especially important if you plan to store heavy items.
Support Structure Assembly
How do you guarantee your DIY garage shelving system can handle the weight of your stored items? By assembling a sturdy support structure, you'll make certain your shelves can withstand the shelf weight of your belongings.
Start by selecting materials that can support the combined weight of your stored items. Consider the material selection of your shelves, uprights, and brackets. For instance, use heavy-duty steel or aluminum for the uprights and brackets, and choose durable, thick plywood or MDF for the shelves.
Next, assemble the uprights by attaching the feet to the floor and the top caps to the ceiling. Make sure they're securely fastened to prevent the structure from toppling over.
Then, attach the shelves to the uprights using the brackets. Confirm the shelves are evenly spaced and the brackets are tightly secured to prevent sagging or collapse.
Consider adding additional supports, such as middle brackets or shelf dividers, to distribute the weight more evenly. By following these steps, you'll create a sturdy support structure that can handle the weight of your stored items, providing a safe and organized garage space.
Securing the Shelving to Walls
You'll need to secure your shelving system to the walls to prevent it from tipping over and to guarantee maximum weight capacity.
Start by installing wall anchors, such as molly bolts or toggle bolts, into the studs behind your drywall.
Next, you'll fasten the shelving unit to these anchors using screws or bolts, making certain they're tightened firmly to create a sturdy connection.
Wall Anchor Installation
Securing your shelving system to the walls is an essential step in guaranteeing its stability and safety. You'll need to choose the right anchor type for your wall material. For drywall or plaster, use anchors with a hollow-wall design, while concrete or brick walls require anchors with a sleeve or anchor bolt design.
Always check the weight capacity of the anchor to verify it can hold the combined weight of your shelving and stored items.
When installing anchors, follow the manufacturer's instructions and take necessary safety precautions. Wear protective gear, such as gloves and safety glasses, and use a level to confirm the anchor is straight.
Drill pilot holes before inserting the anchor to prevent damage to the wall. Avoid over-tightening, as this can cause the anchor to strip or the wall to crack.
Common mistakes include using the wrong anchor type or failing to follow installation instructions. To maintain your wall anchors, regularly inspect for signs of wear or damage and replace them as needed.
Shelving Unit Fastening
With your wall anchors in place, it's time to attach the shelving units to the walls. Confirm the shelf weight is evenly distributed across the wall anchors to prevent the shelves from tilting or collapsing.
Choose the right fastening techniques based on your shelf materials. For example, use screws with a coarse thread for wood shelves and fine thread for metal shelves. Select screw types that match your anchor choices, such as molly bolts or toggle bolts.
Take into consideration the load distribution on each shelf and adjust the fastening pattern accordingly. Verify the wall compatibility with the shelving system, considering any obstructions or weaknesses in the wall.
Prioritize installation safety by wearing protective gear and enlisting a helper if necessary. Double-check the manufacturer's instructions for specific fastening recommendations.
Properly securing the shelves to the walls is essential to prevent accidents and guarantee a sturdy garage shelving system.
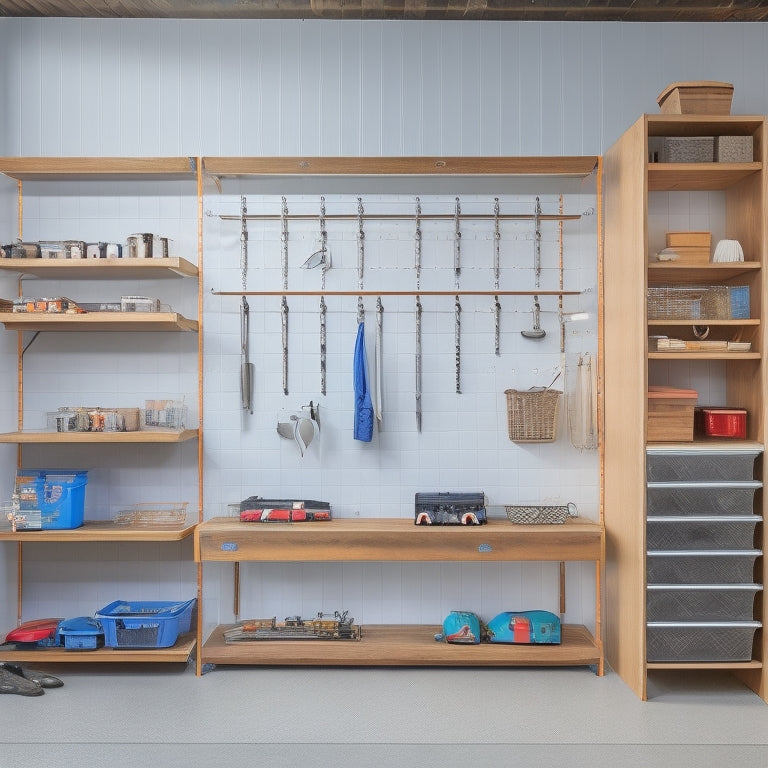
Organizing and Maximizing Storage
Behind the cluttered mess of tools and equipment in your garage lies an opportunity to create a haven of organization and efficiency. As you install your DIY garage shelving system, it's crucial to think about how you can maximize storage and optimize your garage's workflow.
To achieve this, consider the following strategies:
-
Implement space optimization techniques by employing multi-functional storage solutions, such as shelving units with built-in cabinets or hooks for hanging tools.
-
Make use of vertical storage solutions to make the most of your garage's ceiling height, and consider installing shelves or hooks specifically for seasonal items, like holiday decorations or winter gear.
-
Declutter your garage by categorizing tools and equipment into designated zones, and implement tool organization methods, like labeling and categorizing your tools, to guarantee everything has a designated place.
Final Touches and Quality Check
You've organized and optimized your garage storage, now it's time to add the final touches and affirm your DIY garage shelving system meets your needs.
Begin by inspecting the entire system, confirming all shelves are level, securely attached, and capable of holding the intended weight. Check that all screws, bolts, and nuts are tightened properly to prevent any structural failure.
Next, perform a quality assurance check on the finishing touches. Verify that all edges are smooth, and corners are rounded to prevent injuries. Make sure the shelving system is anchored to the wall to prevent it from tipping over.
Check the floor clearance to verify there's enough space to move around comfortably. Finally, walk through the garage, imagining yourself using the space daily, to identify any potential issues or areas for improvement.
Frequently Asked Questions
Can I Install Shelving Over Existing Electrical Outlets?
When installing shelving, you'll need to take safety precautions to guarantee outlet accessibility; you can install shelving over existing outlets, but first, turn off the power, verify the outlet's location, and leave enough clearance to access it safely.
How Do I Handle Uneven or Textured Walls?
Savvy shoppers, suspecting sloppy surfaces, scrutinize wall leveling techniques. You'll adjust brackets to accommodate uneven textures by inserting shims or using adjustable anchors, ensuring a secure, safety-first shelving system that stands the test of time.
Are There Weight Limits for Different Shelving Materials?
You'll need to evaluate shelving material strengths when selecting a system, as different materials have varying weight limits. Research load distribution techniques for your chosen material to guarantee safe installation and prevent collapse or damage.
Can I Use Reclaimed or Repurposed Wood for Shelving?
When sourcing reclaimed wood, you'll need to treat it properly to guarantee safety; inspect for pests, rot, and decay, then apply a wood treatment to prevent further damage, before using it for shelving.
Do I Need to Add a Back Panel to the Shelving Unit?
Imagine your prized possessions tumbling like dominoes - don't let that happen! You're wise to contemplate adding a back panel, which provides stability, prevents items from falling, and adds a sleek finish, while also hiding any unsightly wall imperfections.
Conclusion
You've made it! Congratulations, you've survived the DIY garage shelving system installation gauntlet. Pat yourself on the back, take a deep breath, and gaze upon your handiwork. Your garage now resembles a guiding light of organization, a proof of your DIY prowess. Just don't get too comfortable – you still have to fill those shelves with all the stuff you've been tripping over for months. Happy organizing!
Related Posts
-
3 Pro Garage Organization Ideas to Try Now
You can alter your garage from cluttered chaos to organized oasis with three pro garage organization ideas. First, op...
-
Key Features of a Garage Wall Hanging System
You're looking for a garage wall hanging system that's built to last and adapts to your needs. Look for systems made ...
-

Top 5 Small Tool Organizers for Your Workshop
You're looking to optimize your workshop's efficiency with high-quality small tool organizers. Compact storage soluti...


