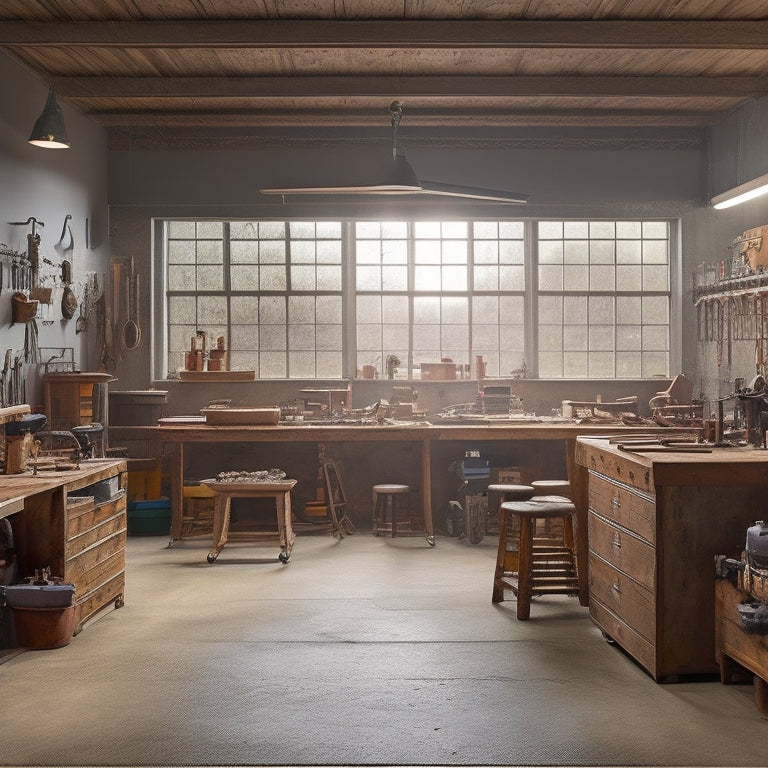
Designing Your Dream Workshop: A Step-by-Step Guide
You're about to create a dream workshop tailored to your unique needs and goals. Start by identifying your tasks, projects, and tools to determine your must-haves, nice-to-haves, and luxuries. Define your workshop objectives and align them with your business strategy. Next, allocate space efficiently by considering the 'work triangle' concept and arranging tools logically. Maximize storage with vertical space, overhead racks, and adjustable shelving. Design for ergonomic comfort with proper chair height and tool accessibility. Now, take the first step towards crafting a space that amplifies your productivity and sparks creativity, and discover how to bring your vision to life.
Key Takeaways
• Identify tasks, projects, and tools to determine must-haves, nice-to-haves, and luxuries for your dream workshop.
• Assess space allocation and layout to ensure efficient workflow, tool placement, and movement within the workshop.
• Design a functional work triangle with core tools and efficient workflow to maximize productivity and comfort.
• Incorporate essential design elements, such as storage solutions, ergonomic comfort, and electrical outlet placement for convenience and safety.
• Balance aesthetics with functionality through color schemes, lighting, and ergonomic workstations to create a welcoming and efficient workspace.
Assessing Your Workshop Needs
Before you start building or renovating your dream workshop, take a step back to identify the specific tasks and projects you'll be working on, and assess the tools and equipment you'll need to accomplish them. This will help you determine the must-haves, nice-to-haves, and luxuries you can live without, considering your budget constraints.
Think about the types of projects you'll be tackling regularly and the frequency of use for each tool. Will you be working on large-scale woodwork or small-scale DIYs? Do you need a dedicated space for metalworking or an area for assembly?
Your personal preferences also play a significant role in shaping your workshop's design. Do you prefer a bright and airy space or a cozy, intimate atmosphere? Are you comfortable with a cluttered workspace or do you need a tidy area to focus?
Defining Your Workspace Requirements
Now that you've assessed your workshop needs, it's time to define your workspace requirements.
You'll need to identify your workshop objectives - what tasks will you be performing, and what kind of projects will you be working on?
Workshop Objectives Defined
Define your workshop objectives by identifying the specific tasks and activities you'll be performing in your dream workshop, as this will help you determine the essential features and layout requirements.
Consider your personal goals: what do you want to achieve in your workshop? Are you looking to create a space for hobby projects, or do you plan to launch a business? Your objectives will influence the type of equipment, storage, and workstations you need.
Align your workshop objectives with your business strategy, if applicable. If you're an entrepreneur, think about the products or services you'll be offering and the workflow required to deliver them. This will help you identify the necessary tools, machinery, and personnel requirements.
Be specific about the tasks you'll be performing daily, weekly, and monthly. Will you be working on large projects or smaller, more intricate pieces?
Space Allocation Needs
You'll need to determine the minimum square footage needed for each area in your workshop to accommodate the equipment, workstations, and storage required to meet your objectives, so start by evaluating the space efficiently. Consider the size and shape of each piece of equipment, as well as the workflow and movement patterns of you and your team.
Make a list of the essential areas, such as a workbench, tool storage, and material storage. Assign a rough estimate of square footage to each area based on your research and experience.
As you allocate space, think about incorporating flexible partitions and adaptive layouts that can be easily rearranged as your needs change. This will allow you to maximize your space and minimize wasted areas. Don't forget to leave some buffer zones for future expansion or unexpected needs.
Choosing the Right Layout Style
When choosing the right layout style for your dream workshop, you'll want to focus on two key aspects: work zone flow and ideal tool placement.
You'll need to contemplate how you'll move around the space, ensuring that your workflow is efficient and safe.
Work Zone Flow
As you envision your dream workshop, consider how you'll move through the space, because a well-planned work zone flow can greatly enhance your productivity and reduce frustration. A well-designed layout should allow you to navigate effortlessly from one task to the next, minimizing distractions and maximizing efficiency.
To achieve this, identify potential zone congestion areas where multiple tasks may overlap, causing bottlenecks in your workflow. For instance, if you're planning a woodworking shop, you might place your table saw and miter saw in separate areas to avoid congestion.
Consider the 'work triangle' concept, where you position frequently used tools and stations to form a triangular path, reducing walking distances and increasing workflow. Additionally, think about the sequence of tasks you'll perform in your workshop. Will you be moving from rough cutting to fine finishing? If so, position your tools in a logical order to streamline your process.
Optimal Tool Placement
By designing your workshop's tool placement with intention, you'll create a layout that complements your work zone flow, allowing you to work more efficiently and effectively.
Consider your most frequently used tools and equipment, and group them according to the tasks you perform most often. This personalized layout will help you move seamlessly between projects, reducing downtime and increasing productivity.
To achieve flexible accessibility, think about the 'golden zone' – the area around your body where you can easily reach tools without straining or bending. Position your most-used tools within this zone to minimize movement and maximize comfort.
Don't forget to leave space for future tool additions or changes in your workflow. A well-planned layout should be adaptable to your evolving needs.
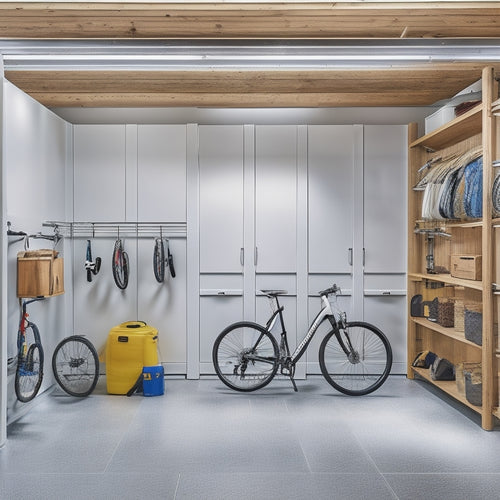
Maximizing Corner Space Efficiency
You'll frequently find that corner spaces in your workshop are often the most underutilized areas, yet they can be optimized with clever storage solutions and design strategies. By installing corner cabinets, you can create a hidden storage space for infrequently used items, keeping them out of the way while maintaining easy access. Look for cabinets with adjustable shelves and soft-close doors to guarantee smooth operation.
Angular shelving is another effective way to maximize corner space. These shelves are specifically designed to fit snugly into corners, providing additional storage for items like bins, baskets, or even power tools. Consider using wall-mounted angular shelving to keep the floor clear and create a sense of openness in the workshop.
When designing your corner space, remember to measure carefully to ensure a snug fit for your chosen storage solution. Don't be afraid to think outside the box and get creative with your design. With a little planning and ingenuity, you can turn those often-wasted corner spaces into valuable storage areas that will help keep your workshop organized and efficient.
Optimizing Tool Station Placement
In the heart of your workshop, strategically placing tool stations can greatly enhance productivity and efficiency. By optimizing tool station placement, you'll reduce walking distances, minimize fatigue, and increase the overall flow of your work process.
To get started, consider the following ergonomic considerations and workflow analysis:
| Ergonomic Considerations | Workflow Analysis |
|---|---|
| Height and Reach: Place tools at comfortable heights to prevent straining your back and shoulders. | Tool Frequency: Identify frequently used tools and position them in easy-to-reach locations. |
| Work Surface: Ensure adequate work surface area for each tool station to accommodate your projects. | Task Sequencing: Arrange tool stations in the order you'll use them to minimize walking distances. |
| Noise and Vibration: Position noisy or vibrating tools away from your main work area to minimize distractions. | Material Flow: Consider the flow of materials and place tool stations accordingly to minimize congestion. |
Creating a Functional Work Triangle
What's the most efficient way to layout your workshop's workstations to maximize productivity, and can a functional work triangle be the answer?
A functional work triangle is a layout strategy that positions your most frequently used tools and workstations in a triangle shape, allowing you to move efficiently between tasks. This layout creates efficient pathways, reducing walking distances and increasing productivity.
Here are three key considerations to create a functional work triangle in your workshop:
-
Identify your core tools: Determine the tools you use most frequently and position them at the points of the triangle.
-
Measure your workflow: Map out the distances between your tools and workstations to make sure the triangle shape minimizes walking distances.
-
Adjust for comfort: Consider your body positioning and comfort when moving between tools to ensure the triangle layout doesn't create awkward movements.
Incorporating Storage and Shelving
As you design your dream workshop, you'll want to make the most of your space by incorporating smart storage and shelving solutions.
You'll start by maximizing your vertical space, optimizing corner areas that often go to waste, and utilizing hidden compartments to stash away tools and supplies.
Maximizing Vertical Space
You'll get the most out of your workshop's ceiling height by installing shelving units that go up to 7-8 feet, allowing you to store less frequently used tools and materials. This high shelving will keep your floor clear and create a sense of openness, making it easier to move around and focus on your projects.
When it comes to maximizing vertical space, consider the following:
-
Overhead Storage: Install overhead storage racks or bins to store items like seasonal decorations, infrequently used tools, or materials that you don't need immediate access to.
-
Adjustable Shelving: Invest in adjustable shelving units that can be customized to fit different sizes of items, ensuring you make the most of your vertical space.
-
Wall-Mounted Hooks: Add wall-mounted hooks to hang items like bikes, tools, or accessories, keeping them organized and out of the way.
Optimizing Corner Areas
Now that you've maximized your workshop's vertical space, turn your attention to the often-wasted corner areas, where clever storage and shelving solutions can reveal hidden potential. Don't let these spaces go to waste! By incorporating corner cabinets and angular shelves, you can create a more efficient and organized workshop.
Here are some ideas to get you started:
| Corner Solution | Description | Benefits |
|---|---|---|
| Corner Cabinets | Install floor-to-ceiling cabinets to store bulky items | Maximizes storage, keeps floor clear |
| Angular Shelves | Add shelves that follow the angle of the corner | Easy access to frequently used items |
| Carousels | Install rotating carousels for easy access to tools | Saves time, reduces clutter |
| Pegboards | Hang pegboards on corner walls for tool organization | Customizable, easy to use |
Utilizing Hidden Compartments
Every workshop has hidden compartments waiting to be discovered, and by incorporating clever storage and shelving solutions, you can reveal their potential to stash valuable tools and supplies out of sight. You'll be amazed at how much more organized and efficient your workshop becomes when you utilize these secret storage spaces.
Here are three ways to get started:
-
Install slide-out drawers in your workbench or shelves to store small tools and parts. This will keep them organized and within easy reach.
-
Create mysterious cabinets with hidden compartments or false backs to store valuable or sensitive items. You can also use these cabinets to store items you don't use frequently, like seasonal decorations or infrequently used tools.
-
Utilize the space above your workbench by installing overhead storage racks or bins to store items like lumber, pipes, or other long materials.
Designing for Ergonomic Comfort
To maximize your productivity and prevent fatigue, design your workshop with ergonomic comfort in mind, considering factors like chair height, work surface elevation, and tool placement. When it comes to body posture, make sure that your work surface is at a comfortable height, allowing you to stand or sit up straight with your shoulders relaxed.
A height-adjustable workbench or table can be a great investment for this purpose. Next, think about hand positioning. Place your most frequently used tools within easy reach, reducing the need for stretching or bending. This will help prevent strain on your hands and wrists.
Consider installing a pegboard or tool organizers on walls or work surfaces to keep tools organized and within reach. Additionally, choose a chair with good lumbar support and adjustable height to promote good posture while seated. By designing your workshop with ergonomic comfort in mind, you'll be able to work more efficiently and avoid discomfort or injury.
Considering Electrical Outlet Placement
When outfitting your workshop with electrical outlets, position them strategically to minimize cord clutter and reduce the risk of tripping hazards, ensuring a safer and more efficient work environment. This is essential for outlet safety, as a well-planned layout can prevent accidents and make sure power distribution is efficient.
Here are some key considerations for outlet placement:
-
Workstations: Place outlets near workstations to reduce the need for extension cords and keep your workspace organized.
-
Tool locations: Position outlets near areas where you'll be using power tools, such as table saws or drill presses, to reduce cord clutter and improve accessibility.
-
Corner areas: Install outlets in corner areas to provide power distribution to multiple areas of the workshop, reducing the need for cord stretching and improving overall workflow.
Balancing Aesthetics and Functionality
As you design your dream workshop, balancing aesthetics and functionality becomes essential, ensuring your space is both visually appealing and highly functional, allowing you to stay focused on your projects.
You want your workshop to inspire creativity and productivity, not distract you from the task at hand. To achieve this balance, begin by selecting a color scheme that reflects your personality and style. Contemplate muted tones that promote focus, or bold colors that stimulate creativity.
Next, ponder texture choices that add depth and visual interest to your space. Exposed brick, wooden accents, or industrial-style metal can create a unique and functional atmosphere.
Don't overlook the functional aspects, such as adequate lighting, ergonomic workstations, and ample storage. By carefully balancing aesthetics and functionality, you'll create a workshop that not only looks amazing but also supports your workflow and helps you achieve your goals.
Frequently Asked Questions
Can I Convert an Existing Garage or Basement Into a Workshop?
'Did you know 70% of homeowners have unused space in their homes? You can convert that garage or basement into a workshop by tackling space planning and conducting a structural assessment to guarantee a safe and functional haven.'
How Do I Ensure Proper Ventilation in My Workshop?
You'll want to conduct an airflow analysis to identify areas of poor ventilation, then develop exhaust strategies like installing vents, fans, or upgrading your HVAC system to guarantee a healthy and safe workshop environment.
Are There Any Specific Building Codes I Need to Follow?
Don't worry, you won't get stuck in bureaucratic red tape! You'll need to check with local authorities about zoning regulations and fire safety codes, ensuring your workshop meets standards and avoids costly rework down the line.
Can I DIY My Workshop Design or Do I Need a Professional?
You can DIY your workshop design if you're comfortable with design constraints and know your personal style, but if you're unsure, consider hiring a pro to guarantee your dream space turns out exactly as you envision it.
How Do I Determine the Ideal Workshop Temperature and Humidity Levels?
'Are you comfortable working in a sweltering hot or freezing cold space? You won't be, so consider climate control for best thermal comfort. You'll want to aim for 68-72°F (20-22°C) and 30-50% humidity to guarantee comfort and protect your tools and materials.'
Related Posts
-

Best Tool Chests for Home Garage Options
When selecting the best tool chest for your home garage, you'll want to evaluate top brands like DeWalt, Milwaukee, a...
-

Maximum Capacity Tool Boxes for Heavy-Duty Use
You need a maximum capacity tool box that can withstand the rigors of heavy-duty use, protecting your essential tools...
-
Modular Garage Organizers for Clutter-Free Spaces
You're likely wasting precious space in your garage due to inefficient storage and poor organization, but modular gar...


