10 Essential DIY Key Holder and Organizer Plans
You're looking for a way to keep your keys and accessories organized and within reach. You'll find 10 essential DIY key holder and organizer plans that cater to different styles and needs. From a simple wooden key holder plan to a modern magnetic key holder, there's something for everyone. You'll discover unique designs like a key organizer with a mail holder, a DIY key rack with hooks, and a customizable key holder box. Get ready to upcycle an old pallet into a functional key storage or create a rustic wooden key organizer. As you explore these plans, you'll uncover even more creative ways to keep your entryway clutter-free.
Key Takeaways
• Consider simple wooden key holder plans or upcycled pallet key storage for a rustic touch to your entryway organization.
• Choose the right hooks and mounting options to ensure secure installation and a clutter-free entryway.
• Design hidden storage compartments for added functionality and a sleek, modern look.
• Incorporate decorative finishes, such as distressed or velvet-lined designs, to add a personal touch to your key holder.
• Explore customizable key holder boxes and organized desk displays to maximize storage and style.
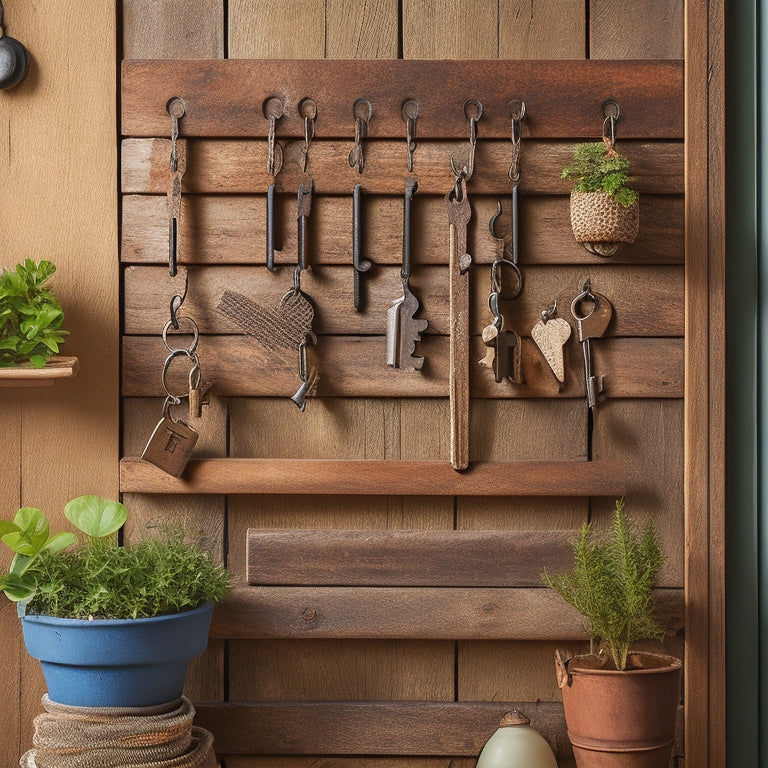
Simple Wooden Key Holder Plan
Create a simple wooden key holder by starting with a 1' x 4' x 6' piece of wood, which will serve as the base of your project. Cut three rectangular slots, each 1' wide and 2' deep, spaced evenly apart to hold your keys. Use a jigsaw or a handsaw to make precise cuts. Sand the wood to smooth out any rough edges and give it a rustic touch.
You can add wooden accents to give your key holder a personalized look. For instance, you can attach small wooden dowels or decorative trim to the edges of the slots. This design flexibility allows you to customize the project to fit your personal style.
Once you've added your desired accents, attach the key holder to a wall using screws or adhesive strips. Make sure it's level and secure to prevent it from falling or toppling over.
With your new wooden key holder, you'll have a convenient spot to store your keys and add a touch of rustic charm to your entryway or hallway.
Key Organizer With Mail Holder
Now that you're ready to create a key organizer with a mail holder, consider the benefits of a mail storage solution that keeps your entryway clutter-free.
You'll appreciate the easy access design that lets you grab your keys and mail in one convenient spot.
Mail Storage Solution
You'll start by building the mail storage compartment, which will be attached to the key organizer, providing a convenient spot to store your daily mail and keep it organized. This compartment will have three separate slots, each measuring 4 inches wide and 6 inches tall, perfect for mail sorting and letter tracking. Cut four pieces of wood to the same size, 1 inch thick, and assemble them using wood glue and nails. Attach the back panel to the key organizer using screws, making sure it's level and secure.
Next, add a small lip to the front of each slot, about 0.5 inches high, to prevent mail from falling out. You can use a small piece of wood or even a metal strip for this.
Easy Access Design
Your key organizer with mail holder takes shape with the easy access design, featuring a cleverly crafted board that holds multiple keys and keeps them within easy reach. This design guarantees you'll never have to dig through your bag or pockets again.
The board's dimensions are 12 inches wide and 18 inches tall, providing ample space for your keys.
To add an extra layer of functionality, incorporate concealed compartments and sliding drawers into your design. These features will allow you to store small items like batteries, screws, or even jewelry.
The sliding drawers can be made using 1x4 lumber, with a soft-close mechanism to prevent them from slamming shut. For the concealed compartments, use a hidden latch system to keep valuable items secure.
When building your key organizer, consider using a stain or paint that complements your home's décor. This will ensure the piece blends seamlessly into your entryway or hallway.
With the easy access design, you'll be able to find what you need quickly and efficiently, making your daily routine a whole lot smoother.
Clutter-Free Entryway
By incorporating your key organizer with mail holder into your entryway, you can create a clutter-free space that sets the tone for a more organized and peaceful living environment. A well-designed key organizer with mail holder can help you stay on top of your daily tasks and keep your entryway tidy.
Here are some benefits of having a clutter-free entryway with a key organizer and mail holder:
-
Streamlined morning routine: With your keys and mail in one spot, you'll save time and reduce morning chaos.
-
Minimalist decor: A sleek key organizer with mail holder complements a minimalist decor, creating a sense of calm and serenity.
-
Functional layout: A well-designed key organizer with mail holder helps maintain a functional layout, keeping your entryway organized and clutter-free.
-
Easy access: No more digging through your bag or pockets for your keys – they're right where you need them.
-
Reduced stress: A clutter-free entryway can help reduce stress and anxiety, setting a positive tone for the rest of your day.
DIY Key Rack With Hooks
You'll love how easily you can create a DIY key rack with hooks that keeps your entryway organized.
First, you'll decide on the type of hooks you need, considering the number of keys you have and the space available on your wall.
Next, you'll follow a simple installation process that requires just a few screws and a level to guarantee everything is straight and secure.
Hooks and Hanging Options
Add hooks to your DIY key rack to maximize its functionality and create a convenient spot for hanging keys, bags, or accessories within easy reach. You can choose from a variety of hook styles and materials, such as metal, wood, or plastic, to match your home decor.
Here are some popular hook and hanging options to ponder:
- Over-the-door hooks for convenient key storage without taking up wall space
- Screw-in hooks for a sturdy hold on your keys and accessories
- Adhesive hooks for a damage-free installation on walls or doors
- Ceiling mounts for a sleek and modern look
- Wall anchors for added security and stability
When selecting hooks, take into account the weight and size of the items you'll be hanging. Make sure to follow the manufacturer's instructions for installation and weight capacity to guarantee a secure hold.
With the right hooks and hanging options, your DIY key rack will become a functional and stylish addition to your home.
Easy Installation Process
With your chosen hooks in hand, tackle the installation process by carefully reading the manufacturer's instructions and gathering the necessary tools, guaranteeing a seamless integration of your DIY key rack into your home's décor. Make sure you have a drill, level, and wall anchors to secure your hooks. Take note of the tool requirements specified by the manufacturer to avoid any mishaps.
Before you start drilling, measure the distance between the hooks and mark the wall accordingly. Use a level to make certain the marks are straight and even. This will save you time and effort in the long run.
As a time saver, consider using a template or stencil to mark the wall, especially if you're not comfortable with freehand measurements.
Once you've marked the wall, drill pilot holes and screw in the wall anchors. Then, hang your DIY key rack with hooks, making sure it's level and secure.
With these easy steps, you'll have a functional and stylish key holder that keeps your entryway organized and clutter-free.
Upcycled Pallet Key Storage
Transforming an old pallet into a functional key storage unit is a great way to breathe new life into discarded materials. You'll not only reduce waste but also create a unique and functional piece for your home. To get started, you'll need to select the right pallet for the job. Look for one made from sturdy wood, with a rustic charm that fits your decor.
Here are some essential steps to keep in mind:
-
Pallet selection: Choose a pallet with a flat surface and sturdy construction. Avoid those with broken or loose boards.
-
Disassemble the pallet: Take apart the pallet into individual planks, and set aside any screws or nails.
-
Cut the planks: Cut the planks into equal sizes, roughly 12 inches long and 3 inches wide.
-
Assemble the key holder: Use wood glue and nails to attach the planks together, forming a rectangular shape.
-
Add hooks and a backing: Attach small hooks to the front of the key holder, and add a backing made from a piece of plywood or MDF.
With these steps, you'll have a functional key storage unit that adds a touch of rustic decor to your home.
Modern Magnetic Key Holder
Now that you've settled on a modern magnetic key holder, it's time to contemplate the design elements that'll make it functional and stylish.
You'll want to contemplate the magnetic strip's strength and placement, ensuring it can hold all your keys securely.
Next, you'll choose a sleek mounting option, such as a wooden or metal plate, and decide whether to add hidden key storage for extra convenience.
Magnetic Strip Design
Design a modern magnetic key holder by attaching a magnetic strip to a wooden or plastic base, perfect for holding multiple keys within easy reach. This sleek design isn't only functional but also adds a touch of modernity to your home decor. To create this holder, you'll need a magnetic strip with a strong magnetic force, a wooden or plastic base, and some basic crafting tools.
Here are some key considerations to keep in mind when designing your magnetic strip:
-
Choose the right magnetic strip pattern: Opt for a strip with a strong magnetic force to hold multiple keys securely. You can choose from various strip patterns, such as a single row or multiple rows, depending on the number of keys you want to hold.
-
Select the right base material: Wooden or plastic bases work well, but you can also experiment with other materials like metal or glass.
-
Measure carefully: Make sure the magnetic strip is the right size for your base and the keys you want to hold.
-
Add a decorative touch: Consider adding a decorative trim or paint to match your home decor.
-
Test the magnetic force: Before attaching the strip to the base, check the magnetic force to ensure it can hold the weight of your keys.
Sleek Mounting Options
Attach your modern magnetic key holder to a wall or cabinet using sleek mounting options like adhesive strips, screws, or 3M command strips, guaranteeing a secure and damage-free installation.
When using adhesive strips, make sure the surface is clean and dry, and press the strip firmly onto the wall for at least 30 seconds. For a more permanent hold, use screws, but be sure to drill pilot holes to avoid damaging the wall. If you're renting or prefer a removable option, 3M command strips are the way to go.
To add an extra layer of security, consider using wall anchors or hidden brackets. Wall anchors will distribute the weight of the key holder more evenly, reducing the risk of the strip or screw coming loose over time. Hidden brackets, on the other hand, will conceal the mounting mechanism, giving your key holder a sleek, streamlined look.
Whatever mounting option you choose, take your time and follow the manufacturer's instructions to ensure a successful installation. With a little patience and attention to detail, you'll be enjoying your modern magnetic key holder in no time!
Hidden Key Storage
Security-conscious individuals will appreciate the clever hiding spots within their modern magnetic key holder, allowing you to stash spare keys, emergency cash, or other small valuables out of sight. This innovative design features secret compartments and hidden safes, providing an extra layer of security for your prized possessions.
Here are some clever ways to utilize the hidden storage in your modern magnetic key holder:
-
Hidden Sliding Compartment: Create a sliding drawer that conceals a small space for storing valuable items like jewelry or cash.
-
Magnetic Key Cache: Design a hidden key cache within the key holder that can be accessed by sliding or lifting a small panel.
-
Fake Outlet Storage: Build a fake outlet that doubles as a hidden storage compartment for small items like USB drives or microSD cards.
-
Hidden Panel Storage: Incorporate a hidden panel that swings open to reveal a storage space for larger items like passports or important documents.
-
Secret Drawer: Construct a secret drawer that blends seamlessly into the design of your key holder, perfect for storing sensitive information or valuable items.
Key and Leash Holder Station
Create a key and leash holder station by repurposing a wooden board or a picture frame to keep your entryway clutter-free and organized. This pet-friendly design is perfect for dog owners who want to keep their furry friend's leash within easy reach.
To get started, find a wooden board or picture frame that's around 12 inches wide and 18 inches tall. Sand it down to smooth out any rough edges, then stain or paint it to match your home's décor.
Attach three to four hooks to the board, spaced about 2 inches apart. You can use metal or wooden hooks, depending on the look you're going for. Make sure they're sturdy enough to hold your keys and leash. If you're planning to hang the station outdoors, choose hooks with outdoor durability to withstand the elements.
Once the hooks are attached, add a small tray or dish at the bottom to catch any stray keys or change. You can also add a small basket or container to store dog treats or toys.
Customizable Key Holder Box
You can elevate your key organization by building a customizable key holder box that suits your personal style and storage needs. This project allows you to get creative with design elements, making it a unique addition to your home.
Here are some features to contemplate when constructing your customizable key holder box:
-
Color schemes: Choose a stain or paint that complements your home decor, from modern neutrals to bold brights.
-
Personalized engravings: Add a special touch with your name, initials, or a meaningful message.
-
Size and shape: Select a design that fits your available wall space and key storage needs.
-
Material options: Work with wood, metal, or a combination of both to create a one-of-a-kind piece.
-
Additional storage: Incorporate small compartments or trays to store other small items, like coins or mail.
With these customizable elements, you'll create a key holder box that not only keeps your keys organized but also reflects your personal style.
Take your time, and have fun with the design process – the end result will be worth it!
Key and Coat Hook Station
Design a key and coat hook station that doubles as a functional and stylish entryway organizer by incorporating hooks, a key holder, and a shelf or ledge to keep your essentials within easy reach. This station won't only keep your keys organized but also add a touch of elegance to your entryway aesthetics.
Start by deciding on the size and material of your station. A rectangular wooden board with a width of 24 inches and a height of 36 inches would be a great starting point. Mount three to four hooks, spaced evenly apart, on the bottom half of the board for hanging coats, hats, and bags.
Above the hooks, create a small shelf or ledge, about 6 inches deep, to store your keys, mail, and other small items. Consider adding a small tray or dish to the shelf to corral loose change or jewelry.
Place the station near the entrance of your home, and you'll be surprised at how it can transform the way you organize your daily essentials. Pay attention to hooks placement, ensuring they're at a comfortable height and spaced to accommodate different sizes of items.
Rustic Wooden Key Organizer
For a more rustic and country-inspired key organizer, repurpose an old wooden plank or board, roughly 12 inches wide and 18 inches tall, to create a functional and charming key holder. You'll love the wooden textures and farmhouse charm this project exudes.
To get started, sand the wooden plank to smooth out any rough edges and give it a distressed finish if desired. Then, attach small metal hooks or knobs to the board, spaced about 2-3 inches apart, to create individual key stations. You can also add a small ledge or shelf to store small items like coins or mail.
Here are some additional details worth considering:
-
Use a wood stain or paint that complements your home's decor
-
Add decorative screws or nails to give it a more rustic look
-
Explore adding a small magnet or tray to store small metal items
-
You can also incorporate a small label or sign with your family's name or a fun quote
-
Don't forget to affix a small hanging device, like a D-ring or sawtooth hanger, to hang your key organizer on the wall
Key and Accessory Tray
Create a sleek and modern key and accessory tray by upcycling an old picture frame or a wooden crate, approximately 6-8 inches wide and 4-6 inches tall, to keep your keys, coins, and other small essentials organized and within reach.
You can add a touch of elegance by lining the tray with velvet or felt, ensuring your valuables don't scratch or get damaged.
Next, attach small compartments or dividers using hot glue or wood glue to separate your keys, coins, and other accessories. You can also add a small lip around the edges to prevent items from falling off.
For a more rustic look, sand the wood to reveal its natural texture or stain it with a rich color.
Place your new key and accessory tray on your desk or entryway, and enjoy the benefits of organized desk organization and stylish accessory display.
You'll appreciate the ease of finding your keys and the added touch of modernity to your space. With this DIY project, you'll be saying goodbye to clutter and hello to a more streamlined you!
Frequently Asked Questions
Can I Customize the Key Holder Plans to Fit My Personal Style?
You can totally make the key holder your own by choosing a color scheme that resonates with your vibe, and don't forget to take advantage of the monogram option to add a personal touch!
What Type of Wood Is Best for DIY Key Holder Projects?
You'll want wood with a beautiful grain pattern, like oak or walnut, and excellent moisture resistance, such as cedar or redwood, to guarantee your DIY key holder withstands daily use and humidity.
Can I Use a Key Holder as a Gift for Friends or Family?
Did you know 65% of people keep gifts from loved ones for over a year? You can create thoughtful Gift Ideas by personalizing a key holder with names, initials, or special messages, making it a unique present for friends and family.
How Do I Attach the Key Holder to the Wall Securely?
You'll need wall anchors and the right screws to secure your key holder. Choose anchors that fit your wall type, and use screws like drywall or molly bolts for a sturdy hold.
Are DIY Key Holders Suitable for Small or Rented Spaces?
"Can you imagine searching for keys in a cluttered, cramped space? You don't have to. DIY key holders are perfect for small or rented spaces, working around space constraints and rental limitations with compact designs and removable adhesives."
Related Posts
-
Adjustable Modular Shoe Racks for Versatility
Adjustable modular shoe racks are your go-to solution for versatile and organized footwear storage. These racks maxim...
-
Creative Workshop Storage Solutions and Ideas
You can revolutionize your workshop's storage by maximizing vertical space with wall-mounted racks, utilizing hidden ...
-
Best Materials for Garage Wall-Mounted Cabinets
When selecting materials for your garage wall-mounted cabinets, you'll want to evaluate options that balance durabili...


